Getting started
This section gives a short outline on how to get started using the editor and how to navigate the ui. Information about the settings for the editor can be found in Db editor Settings.
Launching the editor
From Spine Toolbox
There are two different ways to open a single database in Spine database editor from Spine Toolbox:
Using a Data Store project item:
Create a Data Store project item.
Select the Data Store.
Enter the url of the database in Data Store Properties.
Press the Open editor… button in Data Store Properties or double-click the Data Store project item.
Without a Data Store:
From the main window select File -> New DB Editor.
Open the menu by clicking on the hamburger menu icon (☰) or by pressing ALT+F or ALT+E.
Select Open… to open an existing database, New.. to create a new one or paste a database URL into the URL bar.
From the command line
To open a single database in Spine database editor, use the spine-db-editor
application which comes with Spine Toolbox. After the virtual environment is activated
the editor can be opened with the following command:
spine-db-editor "...url of the database..."
Note that for e.g. an SQLite database, the url should start with sqlite:/// followed by the path.
Adding multiple databases to one editor
It is possible to open multiple databases in the same editor. This allows one to view and modify the data of the open databases in one editor.
To open multiple SQLite databases in the same Spine database editor by file browser:
Open a database Database editor using any of the ways explained before.
Select Add… from the editor’s hamburger menu (☰).
Browse to the directory of the SQLite file and open it.
By using the database URL:
Open a database Database editor using any of the ways explained before.
In the URL bar, after the already open database’s URL add a semicolon
;and after that the URL of the other database to be opened in the same editor.
Knowing the UI
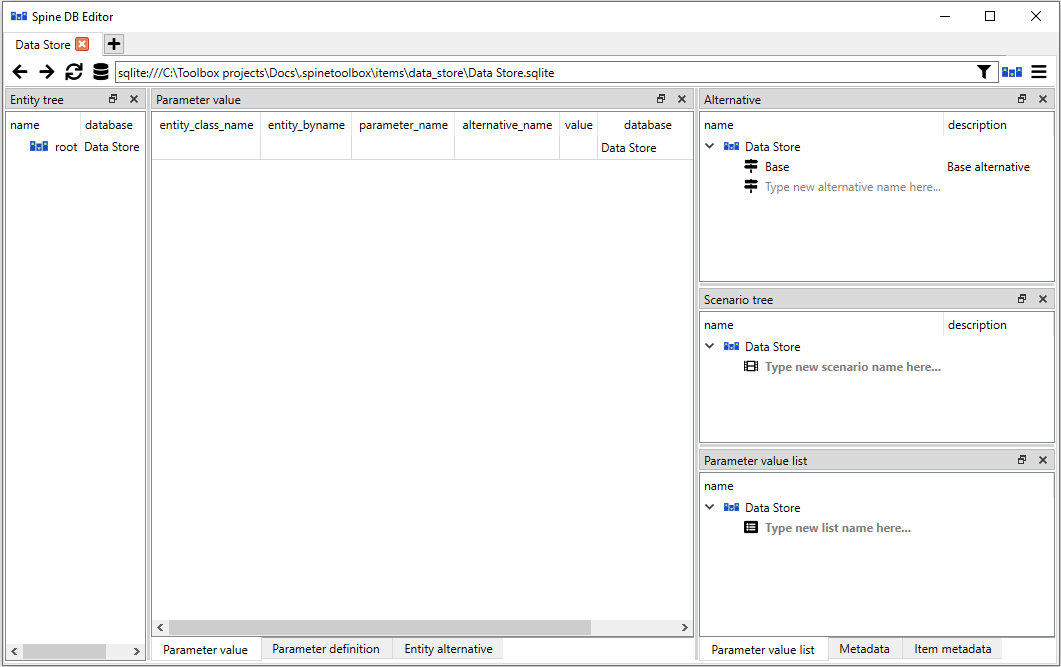
When you open an empty database for the first time in a Spine Database Editor, it should look something like this:

The dock widgets can be scaled by dragging them from the sides and moved around by dragging them from their darker colored headers. Like with other widgets, Toolbox remembers the customizations and the editor will open in the same configuration when it is opened the next time. The dock configurations are URL specific. the configurations for the URL can be restored back to default from the hamburger menu View->Docks…->Reset docks.
Tab bar
The uppermost UI element is the tab bar. One editor window can have multiple tabs. New tabs can be added by pressing the plus-sign (+) in the tab bar. In the newly created tab, databases can be opened once again with the instructions given above. Tabs can be deleted from the editor by pressing the cross (X) inside a tab. The tabs can be dragged from the tab bar to create new editor windows. Tabs from different windows can also be dragged into others, fusing them into the same editor window.
Filter
The filter can be used to select which items are allowed to be shown in the editor. The filter is based on scenarios. By pressing the filter image in the right end of the URL bar, the filter selector widget opens up. There the desired scenario can be selected. When a selection is made and the Update filters button is pressed, the changes will be applied to the editor. Now all entities, parameters etc. will be filtered out if they don’t belong to the scenario specified in the filter.
Tip
Note that after applying the filter, the URL gets updated with some additional information about the filters. It is therefore possible to make changes to the filtering just by modifying the URL from the URL bar.
Undo and redo
Whenever changes are made to the data in the Spine Database Editor, the changes get stored into memory. This allows undoing and redoing the operations made in the editor. Buttons for these operations can be found in the hamburger menu and the usual shortcuts Ctrl+Z and Ctrl+Y work also. However if the changes are committed, the memory for the changes gets cleared meaning that the changes before the commit can’t be undone anymore.
Views and trees
Spine Database Editor has the following main UI components:
Entity tree: they present the structure of entities in all databases in the shape of a tree.
Table views (Parameter value, Parameter definition, Entity alternative): they present entity data in the form of stacked tables.
Pivot table and Frozen table: they present data in the form of a pivot table, optionally with frozen dimensions.
Graph view: it presents the structure of classes and entities in the shape of a graph.
Parameter value list: it presents parameter value lists available in the databases.
Alternative: it presents alternatives defined in the databases in the shape of a tree.
Scenario tree: it presents scenarios defined in the databases in the shape of a tree.
Metadata: presents metadata defined in the databases.
Item metadata: shows metadata associated with the currently selected entities or parameter values.
Tip
You can customize the UI from the View section in the hamburger ☰ menu. There the Docks… menu can be used to enable and disable the different UI components listed above.
Items from the trees can be selected by clicking them with the left mouse button and the views will react to the changes. By default, multiple items can be selected at the same time across the trees by holding down Ctrl while making the selections. This behavior can be flipped from the editor settings (Ctrl+,) by toggling the Sticky selection -setting.
In the next section you will learn more about the different UI components and views available in the editor