Getting Started
Welcome to the Spine Toolbox’s getting started guide. In this guide you will learn two ways of running a “Hello, World!” program on Spine Toolbox. If you need help on how to run SpineOpt.jl using Spine Toolbox, see chapter How to Set up SpineOpt.jl. For small example projects utilizing SpineOpt.jl, see SpineOpt tutorials.
This chapter introduces the following topics:
Spine Toolbox Interface
The central element in Spine Toolbox’s interface is the Design View, which allows you to visualize and manipulate your project workflow. In addition to the Design View there are a few dock widgets that provide additional functionality:
Properties provides an interface to interact with the currently selected project item.
Event Log shows relevant messages about user performed actions and the status of executions.
Console allows Spine Toolbox to execute Tools written in Python, Julia or GAMS and provides an interface to interact with the aforementioned programming languages. Also shows a list of parallel executions available in the project.
In addition to the Design View and the dock widgets, the main window contains three Toolbars. The Generic Items Toolbar contains the project items that you can drag-and-drop onto the Design View. These items are generic in the sense that that they need to be fully configured for their task. The Specifications Toolbar, on the other hand, holds specific configurations for project items. The third Toolbar, Execute, has buttons related to executing the project.
Tip
You can drag-and-drop the dock widgets around the screen, customizing the interface at your will. Also, you can select which ones are shown/hidden using either the View -> Dock Widgets menu, or the right-click context menu of any of the Toolbars. Spine Toolbox remembers your configuration between sessions. Selecting Restore Dock Widgets from the View -> Dock Widgets menu restores the widgets back to their default location.
Tip
Most elements in the Spine Toolbox’s interface are equipped with tool tips. Leave your mouse cursor over an element (button, checkbox, list, etc.) for a moment to make the tool tip appear.
Creating a Project
To create a new project, please do one of the following:
From the application main menu, select File -> New project…
Press Ctrl+N.
The Select project directory (New project…) dialog will show up. Browse to a folder of your choice and create a new directory called ‘hello world’ there. Then select the ‘hello world’ directory and click Select Folder. Spine Toolbox will populate the selected directory with some files and directories it needs to store the project’s data.
Congratulations, you have created your first Spine Toolbox project.
Creating a Tool Specification
Note
Spine Toolbox is designed to run and connect multiple tools, which are specified using Tool specifications. You may think of a Tool specification as a self-contained program specification including a list of source files, required and optional input files, and expected output files. Once a Tool specification is added to a project, it can then be associated to a Tool item for its execution as part of the project workflow.
Note
Just like the main window, the Tool specification editor consists of dock widgets that you can reorganize however you like.
Since there are no Tool specifications in the project yet, click on the ![]() button
in Specifications Toolbar and select Tool from the popup menu to open the Tool specification editor.
Follow the instructions below to create a minimal Tool specification:
button
in Specifications Toolbar and select Tool from the popup menu to open the Tool specification editor.
Follow the instructions below to create a minimal Tool specification:
Type ‘hello_world’ into the Name field.
Select ‘Python’ from the Tool type dropdown list,
Click on the
 button next to the Main program file text in the Program files dock widget. A
Create new main program file file browser dialog opens. Name the file
button next to the Main program file text in the Program files dock widget. A
Create new main program file file browser dialog opens. Name the file hello_world.pyand save it e.g. directly to the ‘hello world’ project directory or to a folder of your choice.
We have just created a hello_world.py Python script file, but at the moment the file is empty. Spine Toolbox provides
an mini IDE where you can view and edit the contents of Tool specification files. Let’s try it out.
Select hello_world.py below the Main Program File. Click on the (black) editor dock widget with the title
‘hello_world.py’.
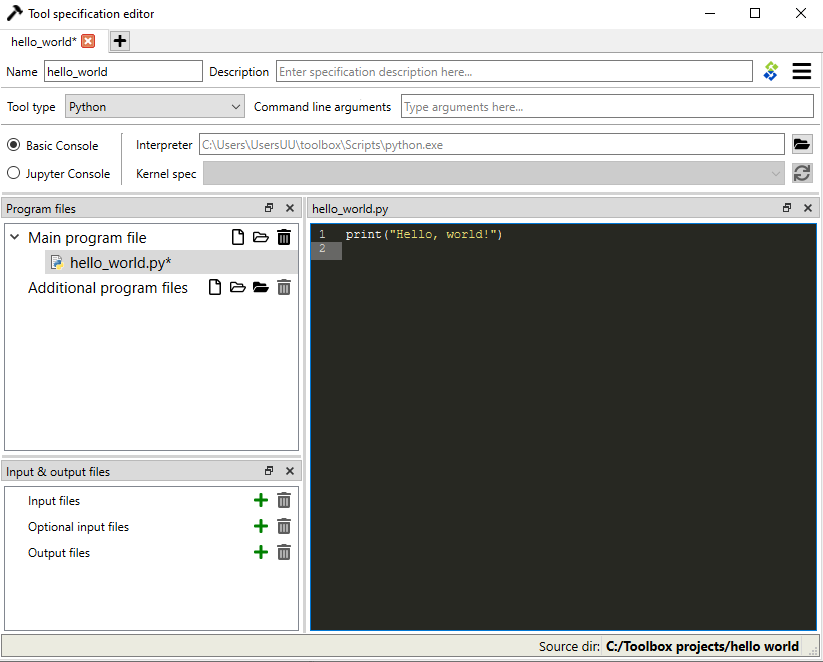
Type in the following:
print("Hello, world!")
Now, whenever hello_world.py is executed, the sentence ‘Hello, World!’ will be printed to the standard output.
The Tool specification editor should be looking similar to this now:
Note that the program file (hello_world.py) and the Tool specification (hello world) now have unsaved changes.
This is indicated by the star (*) character next to hello_world.py* and the Tool specification name in the tab bar
(hello_world*).
Save changes to both by either pressing Ctrl+S or by mouse clicking on Save in the hamburger menu in the upper right hand corner.
Close Tool specification editor by pressing Alt+F4 or by clicking on ‘X’ in the top right corner of the window.
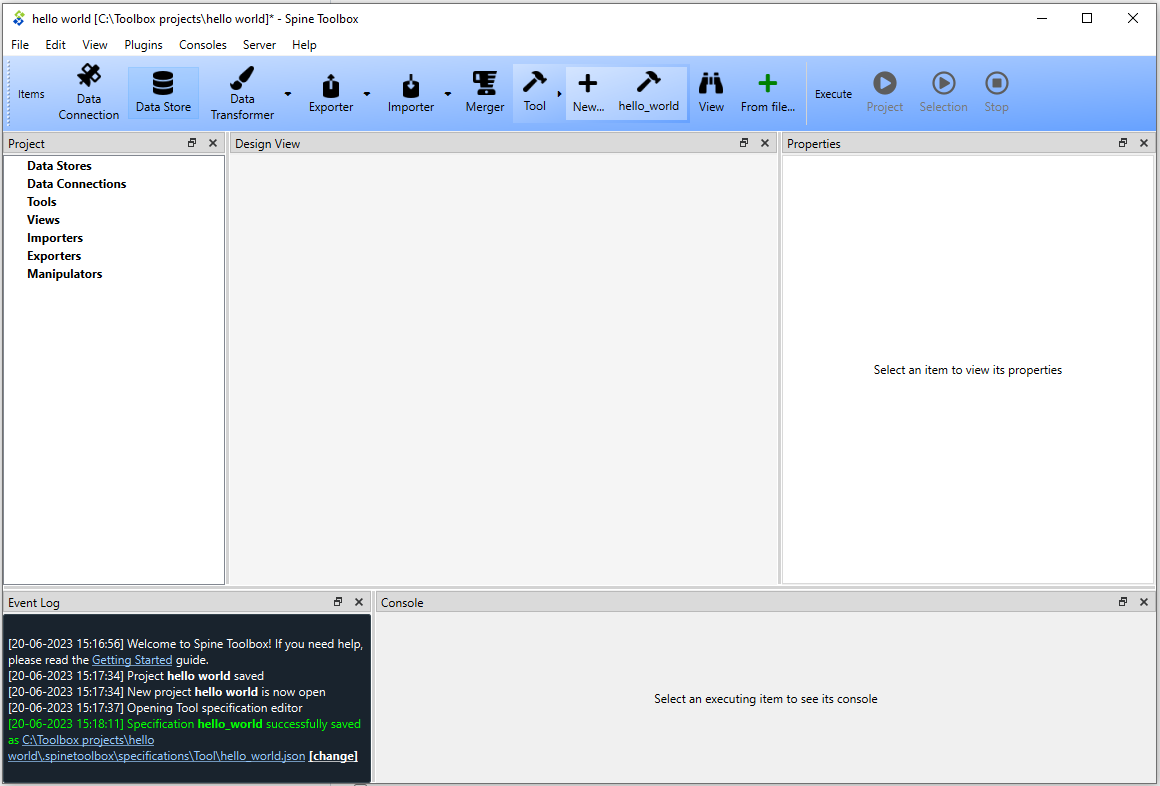
The new ‘hello_world’ tool has now been added to the Specifications Toolbar and your main window should look similar to this:
Tool specifications are saved by default in JSON format into a dedicated directory under the project directory. If you
want, you can open the newly created hello_world.json file by clicking on the file path in the Event log message.
The file will open in an external editor provided that you have selected a default program for files with the .json
extension (e.g in Windows 10 you can do this in Windows Settings -> Apps -> Default apps). In general, you don’t need
to worry about the contents of the JSON Tool specification files. Editing these is done under the hood by the app.
If you want to save hello_world.json somewhere else, you can do this by clicking the white [change] link
after the path in the Event Log.
Tip
A Tool specification (and any other specification) can be reused in another project.
To do this, you just need to click the ![]() button in the Specifications Toolbar
and select From specification file… from the popup menu.
This opens a file browser dialog that lets you select the specification file (.json) from your system.
button in the Specifications Toolbar
and select From specification file… from the popup menu.
This opens a file browser dialog that lets you select the specification file (.json) from your system.
Congratulations, you have just created your first Tool specification.
Adding a Tool Item to the Project
Note
The Tool project item is used to run Tool specifications.
Let’s add a Tool item to our project, so that we’re able to run the Tool specification we created above.
To add a Tool item, drag-and-drop the Tool icon ![]() from the Generic items Toolbar onto the Design View.
from the Generic items Toolbar onto the Design View.
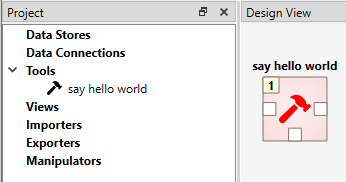
The Add Tool dialog will popup. Change name of the Tool to ‘say hello world’, and select ‘hello_world’ from the dropdown list just below, and click Ok. Now you should see the newly added Tool item as an icon in the Design View. It should look similar to this:
Another way to do the same thing is to drag the ![]() with the ‘hello world’ text
from the Specifications Toolbar onto the Design View.
Similarly, the Add Tool form will popup but the ‘hello world’ tool specification is already
selected from the dropdown list.
with the ‘hello world’ text
from the Specifications Toolbar onto the Design View.
Similarly, the Add Tool form will popup but the ‘hello world’ tool specification is already
selected from the dropdown list.
Note
The Tool specification is now saved to disk but the project itself is not. Remember to save the project every once in a while when you are working. You can do this by selecting File -> Save project from the main window or by pressing Ctrl+S when the main window is active. If the project is in such a state that it has unsaved changes, an asterisk * is visible after the project name and path in the upper left corner of the main window.
Executing a Tool
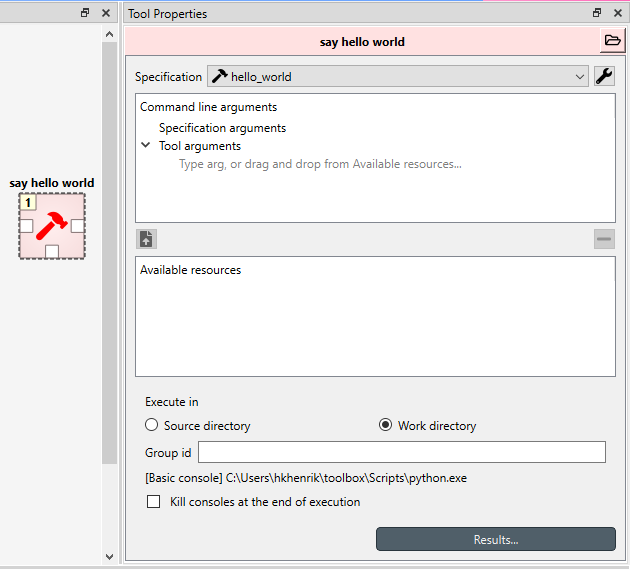
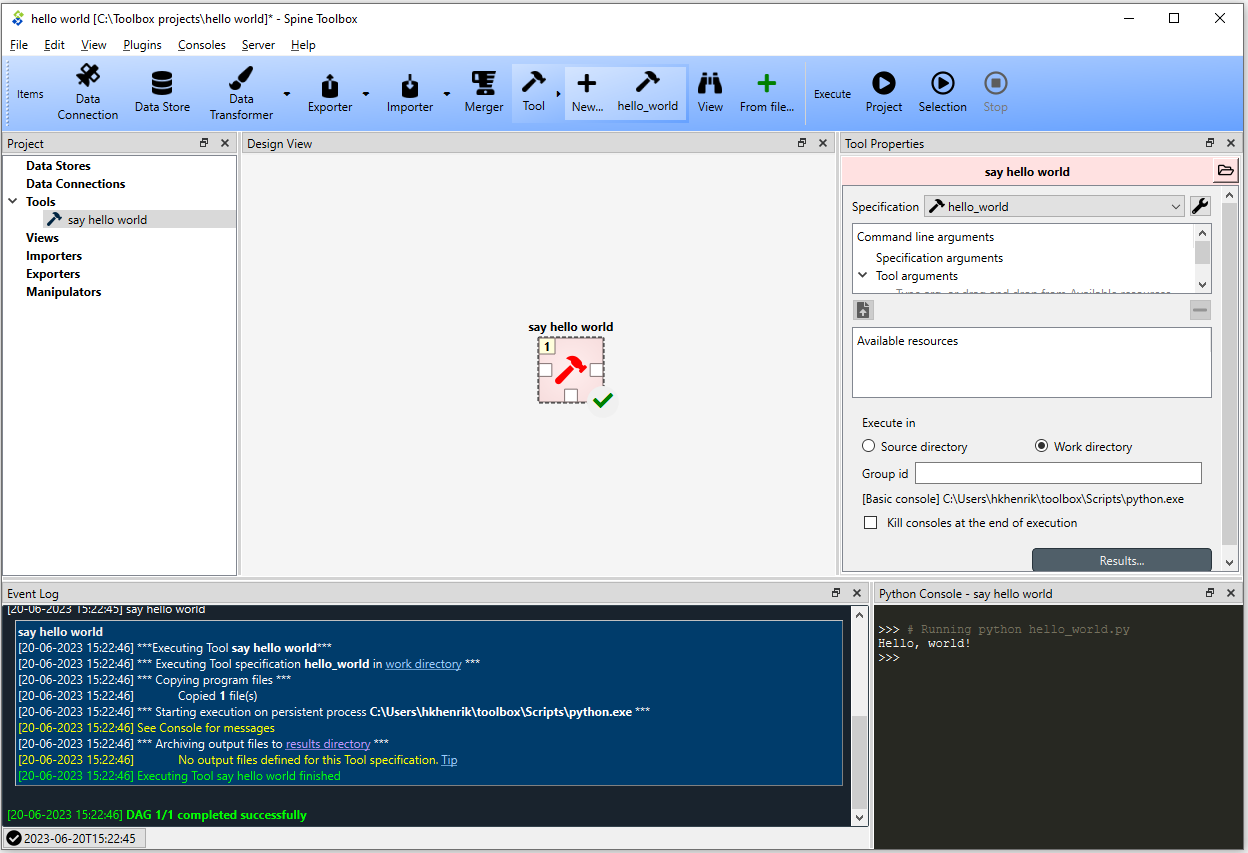
Select the ‘say hello world’ Tool on Design View, and you will see its Properties in the dedicated dock widget. It looks similar to this:
Press execute project ![]() button on the Execute Toolbar.
This will execute the ‘say hello world’ Tool project item
which now has the ‘hello world’ Tool specification associated to it. In actuality, this will run the main program
file
button on the Execute Toolbar.
This will execute the ‘say hello world’ Tool project item
which now has the ‘hello world’ Tool specification associated to it. In actuality, this will run the main program
file hello_world.py in a dedicated process.
Once the execution is finished, you can see the details about the item execution as well as the whole execution in Event Log. The Console contains the output of the executed program file.
Note
For more information about setting up Consoles in Spine Toolbox, please see Setting up Consoles and External Tools for help.
Congratulations, you just executed your first Spine Toolbox project.
Editing a Tool Specification
To make things more interesting, we will now specify an input file for our ‘hello_world’ Tool specification.
Note
Input files specified in the Tool specification can be used by the program source files, to obtain input data for the Tool’s execution. When executed, a Tool item looks for input files in Data Connection, and Exporter project items connected to its input.
Open the Tool specification editor for the ‘hello world’ Tool spec. You can do this, for example, by double-clicking
the ‘say hello world’ Tool in Design View, or from the Tool Properties by clicking the
Tool specification options button (![]() ) next to the specification and selecting Edit specification.
) next to the specification and selecting Edit specification.
In Input & Output files dock widget, click the ![]() button next to the Input Files text. A dialog appears,
that lets you enter a name for an input file. Type ‘input.txt’ and press Enter.
button next to the Input Files text. A dialog appears,
that lets you enter a name for an input file. Type ‘input.txt’ and press Enter.
So far so good. Now let’s use this input file in our program. Still in the Tool specification editor, replace the
text in the main program file (hello_world.py), with the following:
with open("input.txt") as input_file:
    print(input_file.read())
Now, whenever hello_world.py is executed, it will look for a file called input.txt
in the current directory, and print its content to the standard output.
The editor should now look like this:
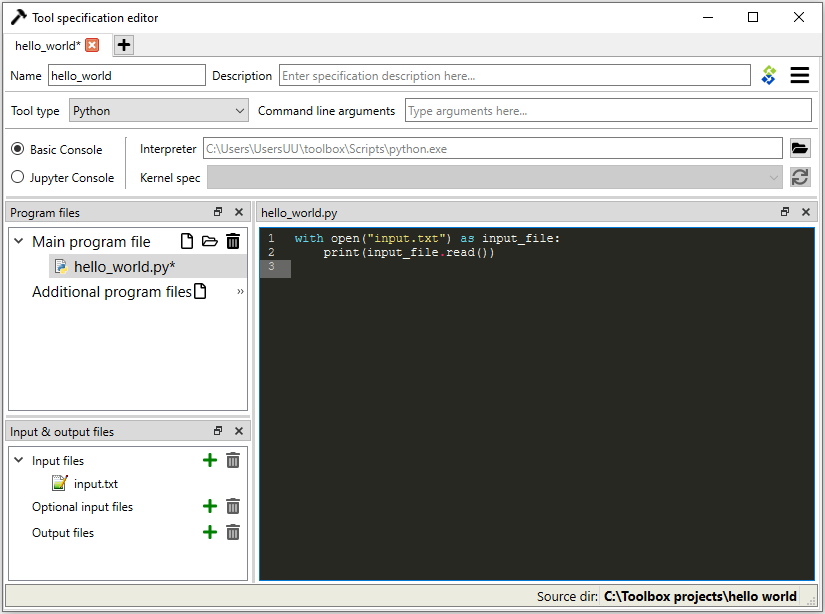
Save the specification and close the editor by pressing Ctrl+S and then Alt+F4.
Note
See Tool Specification Editor for more information on editing Tool specifications.
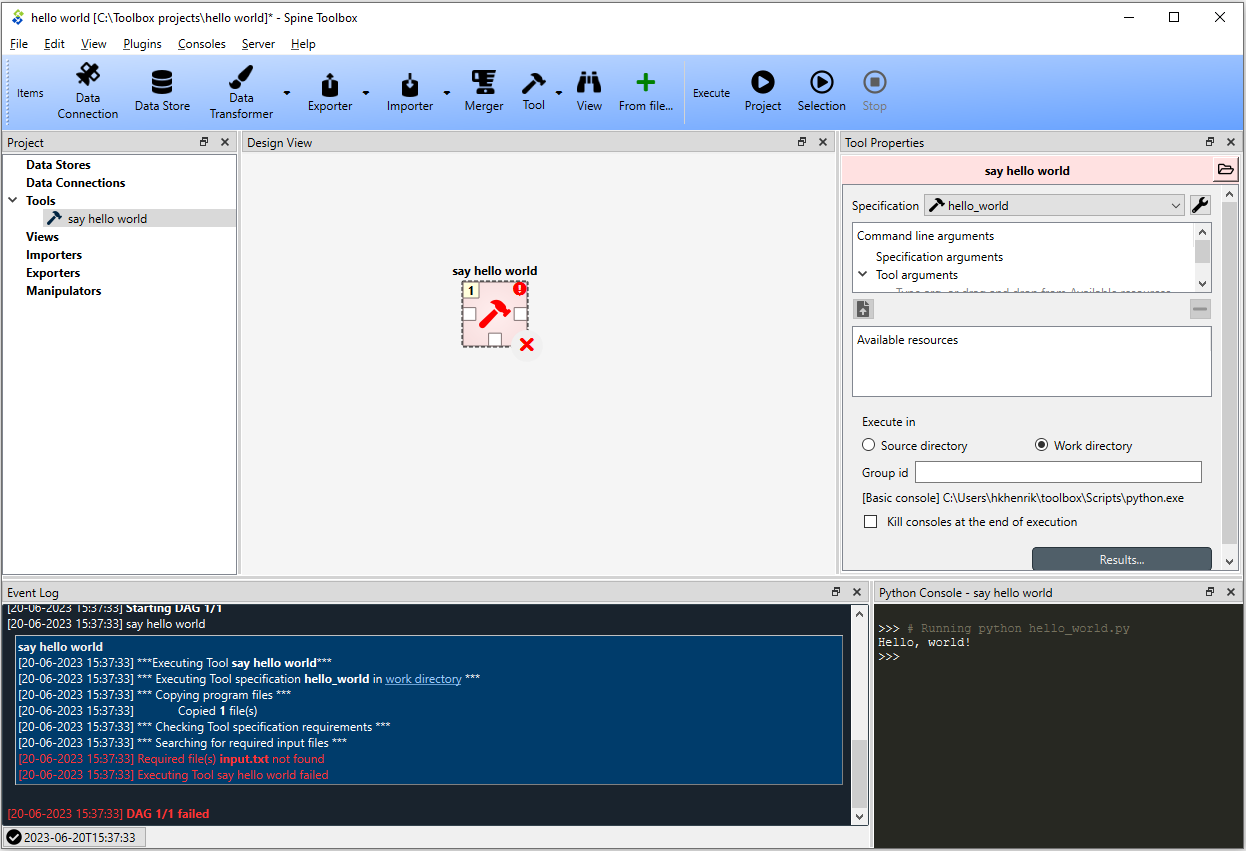
Back in the main window, note the exclamation mark on the Tool icon in Design View, if you hover the mouse over
this mark, you will see a tooltip telling you in detail what is wrong. If you want you can try and execute the
Tool anyway by pressing ![]() in the Execute Toolbar.
The execution will fail because the file
in the Execute Toolbar.
The execution will fail because the file input.txt is not made available for the Tool:
Adding a Data Connection Item to the Project
Note
The Data Connection item is used to hold generic data files, so that other items, notably Importer and Tool, can make use of that data.
Let’s add a Data Connection item to our project, so that we’re able to pass the file input.txt to
‘say hello world’. To add a Data Connection item, drag-and-drop the Data Connection icon (![]() )
from the Generic items Toolbar onto the Design View.
)
from the Generic items Toolbar onto the Design View.
The Add Data Connection form will show up. Type ‘pass input txt’ in the name field and click Ok. The newly added Data Connection item is now in the Design View.
Adding Data Files to a Data Connection
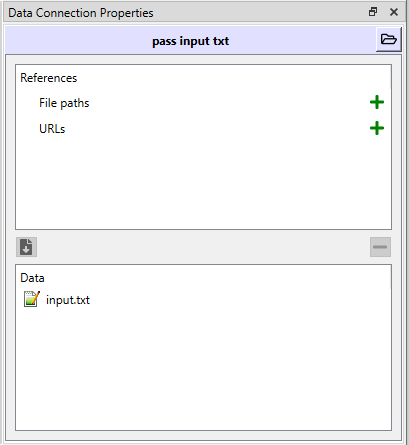
Select the ‘pass input txt’ Data Connection item to view its properties in the Properties dock widget. It should look similar to this:
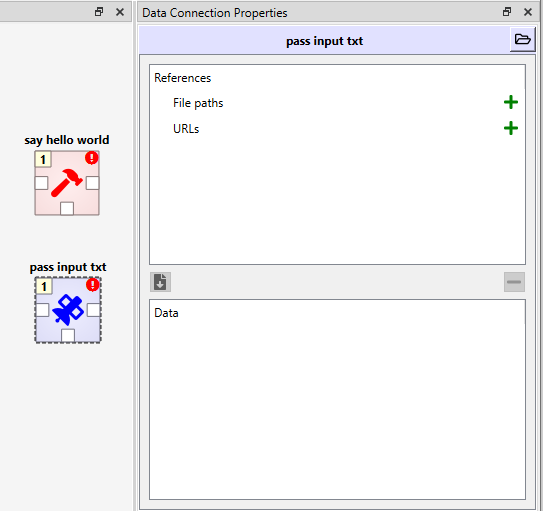
Right click anywhere within the Data box and select New file… from the context menu. When prompted to enter a name for the new file, type ‘input.txt’ and click Ok.
There’s now a new file in the Data list:
Double click this file to open it in your default text editor. Then enter the following into the file’s content:
Hello again, World!
Save the file.
Connecting Project Items
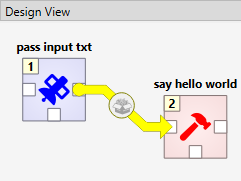
As mentioned above, a Tool item looks for input files in Data Connections or other items connected to its input. Thus you now need to create a connection from ‘pass input txt’ to ‘say hello world’. To do this, click on one of the connector slots at the edges of ‘pass input txt’ in the Design view, and then on a similar slot in ‘say hello world’. This will create an arrow pointing from one to another, as seen below:
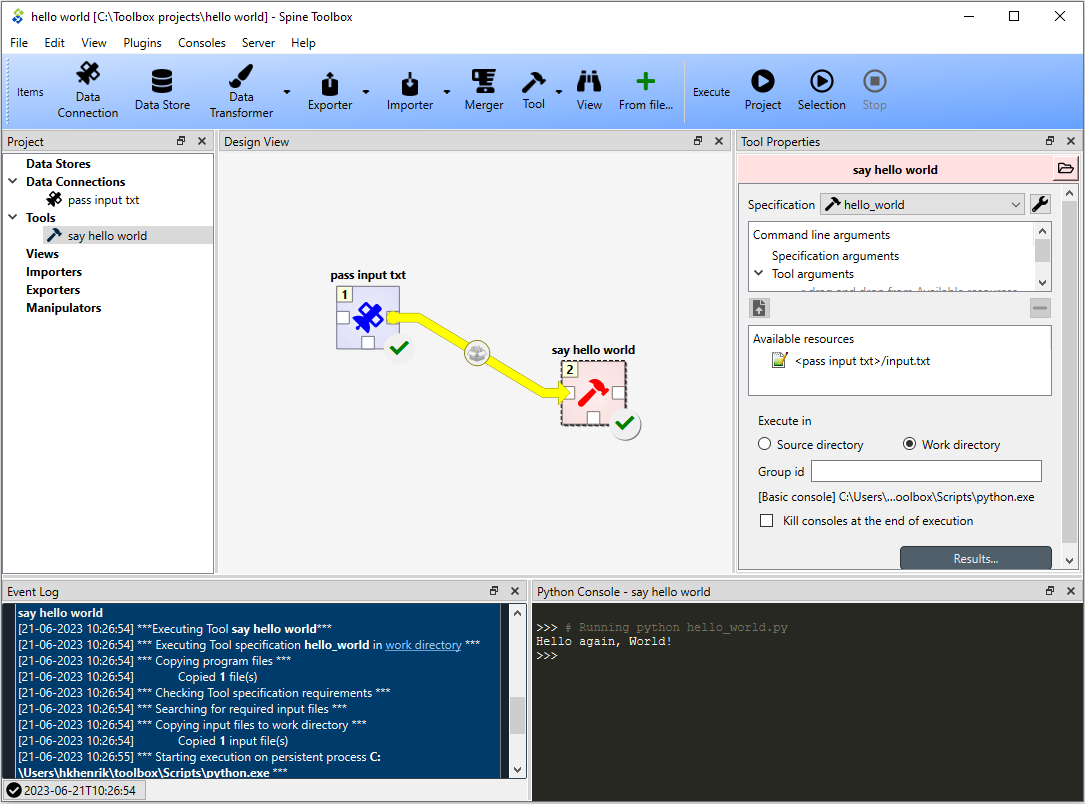
Press ![]() once again. The project will be executed successfully this time:
once again. The project will be executed successfully this time:
That’s all for now. I hope you’ve enjoyed following this guide as much as I enjoyed writing it. See you next time.
Where to next: If you need help on how to set up and run SpineOpt.jl using Spine Toolbox, see chapter How to Set up SpineOpt.jl. After setting up SpineOpt, you can follow the Simple system tutorial over on SpineOpt.jl’s documentation that will help you get started on using SpineOpt in Spine Toolbox.
If you are interested in more tutorials, head on to Tutorials and Examples.