Importing and Exporting Data
This section explains the different ways of importing and exporting data to and from a Spine database.
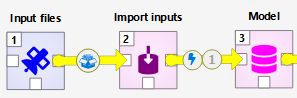
Importing Data with Importer
Data importing is handled by the Importer project item which can import tabulated and to some degree tree-structured data into a Spine database from various formats. An Importer lets you define mappings that map the input data to Spine data structure. Importing is also available in Spine database editor from File->Import… but it uses fixed mappings. Even then using an Importer item is preferred because then the process is documented and repeatable.
A common use case for Importer is to transform data from one or more input files to a Data Store as the first step in a workflow. The files can be provided by one or more Data Connection items.
If importing multiple CSV files with differing contents, it might be beneficial to pack the files into a datapackage by checking Pack CSV file (as datapackage.json) in the properties of the incoming link. This way the files appear as a single source in Importer where each file represents a separate table.
It might also be worth checking Purge before writing in the outgoing link. This ensures that the target database gets cleaned before new data is imported.
If multiple Importers are to write to the same Data Store, consider setting write indexes in the outgoing arrow. This makes the process repeatable and is crucial if the data imported by one of the Importers depends on data from another Importer.
Another common use case is to import the results of a data processing Tool to an output Data Store. The Tool’s specification has to have Output files specified so Importer knows what files to expect.
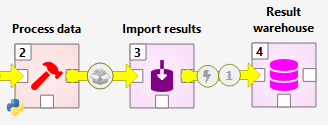
Again, if the Tool produces multiple CSV files, using a datapackage might a good option.
If no alternative is specified by Importer’s mappings, parameter values will be imported for a synthetic alternative, name of which consists of the selected scenario and current time stamp. This allows identification of the results by scenario and run time. In this case there is no need set the target Data Store to be purged before writing.
Properties Dock
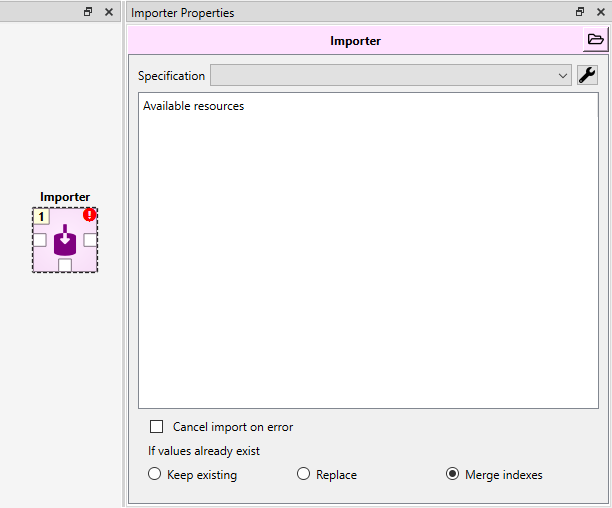
At the top of the Properties dock (or tab), there is a combo box and the ![]() button
which you can use to select and modify the Importer’s specification.
button
which you can use to select and modify the Importer’s specification.
The Available resources pane lists files and database URLs provided by predecessor project items, e.g Data Connections, that can be imported. The items in the list can be checked and unchecked for import.
Note
The mappings defined in Importer’s specification are applied to each selected resource individually, meaning that the resources must be of the same input type and contain the same tables. For example, Excel files with different sheets and content need different Importers.
There is also the option to cancel the import if a non-fatal error occurs during execution and three options for how to handle if some of the values that you are trying to import already exist in the target Data Store. The three choices are:
- Keep existing
When this is selected, data that is already in the target Data Store will be kept and the new data the Importer tried to import is forgotten.
- Replace
This option means that the imported data replaces old data in the target Data Store.
- Merge indexes
This option works mostly like the Replace option, but for indexed values like maps, time series and arrays the behavior is a little different. With these value types the old index-value pairs in the target Data Store will be kept and the new value pairs will be appended to it. If an index that is going to get imported already exist, the new imported value will overwrite the old value.
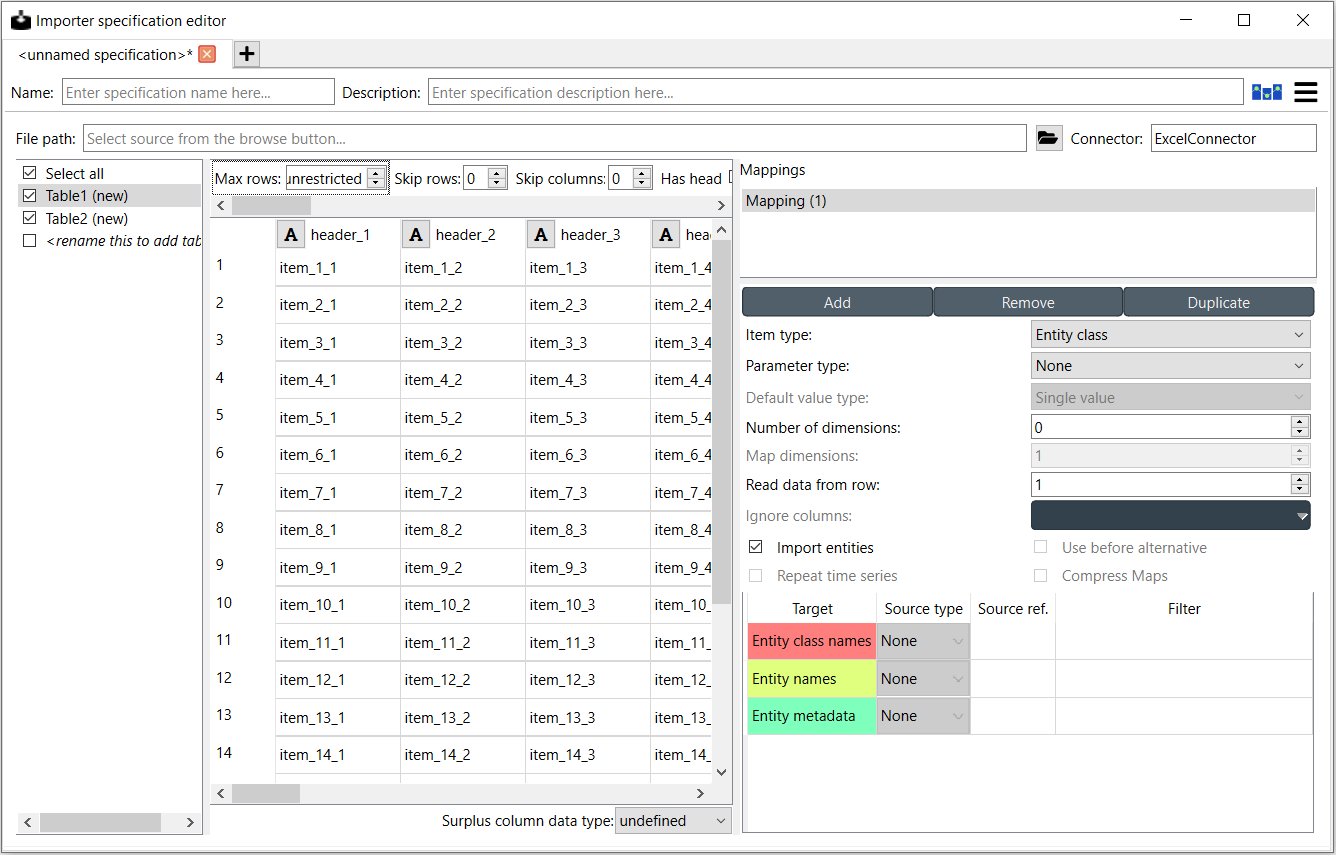
Importer Specification Editor
The heart of Importer is the Importer Specification Editor window
in which the mappings from source data to Spine data are set up.
The editor window can be accessed
by the ![]() button in Importer’s Properties dock where existing specifications can also be selected,
or by double-clicking the item on the Design View.
button in Importer’s Properties dock where existing specifications can also be selected,
or by double-clicking the item on the Design View.
When the specification editor is opened for an Importer without a specification, a list of supported file formats or other data sources is presented. If the Importer is connected to some data, it may have already selected the proper connector and is only waiting for confirmation

When creating an Importer specification, it is usually helpful to have the data already connected to the Importer in question so it is easier to visualize how the importer is handling the data.
In the upper part of the specification editor, the name and description for the specification can be set.
Underneath, a modifiable Input file/URL field is shown. Importer reads table names and the data that is shown in the center pane from this input source. Usually, you would use the Importer’s actual input resource as the input source here, but nothing stops you from building or viewing the mappings based on any other file or database.
Next to the input file/URL the input type is shown. This can be changed from Menu->Switch input type…. On the left side, the different tables the file has or that user has set up are shown. In top center, there are input type specific options that apply to the currently selected table. Below the options, a preview of the selected table is shown. The items in the table are highlighted according to the selected mapping. The selection is done from the table-specific mapping list in the right side of the editor. Underneath the list, the to be imported item types can be specified and other options set for the selected mapping. Below that you can select the specific places in the source data where the entity names, values etc. will be taken from.
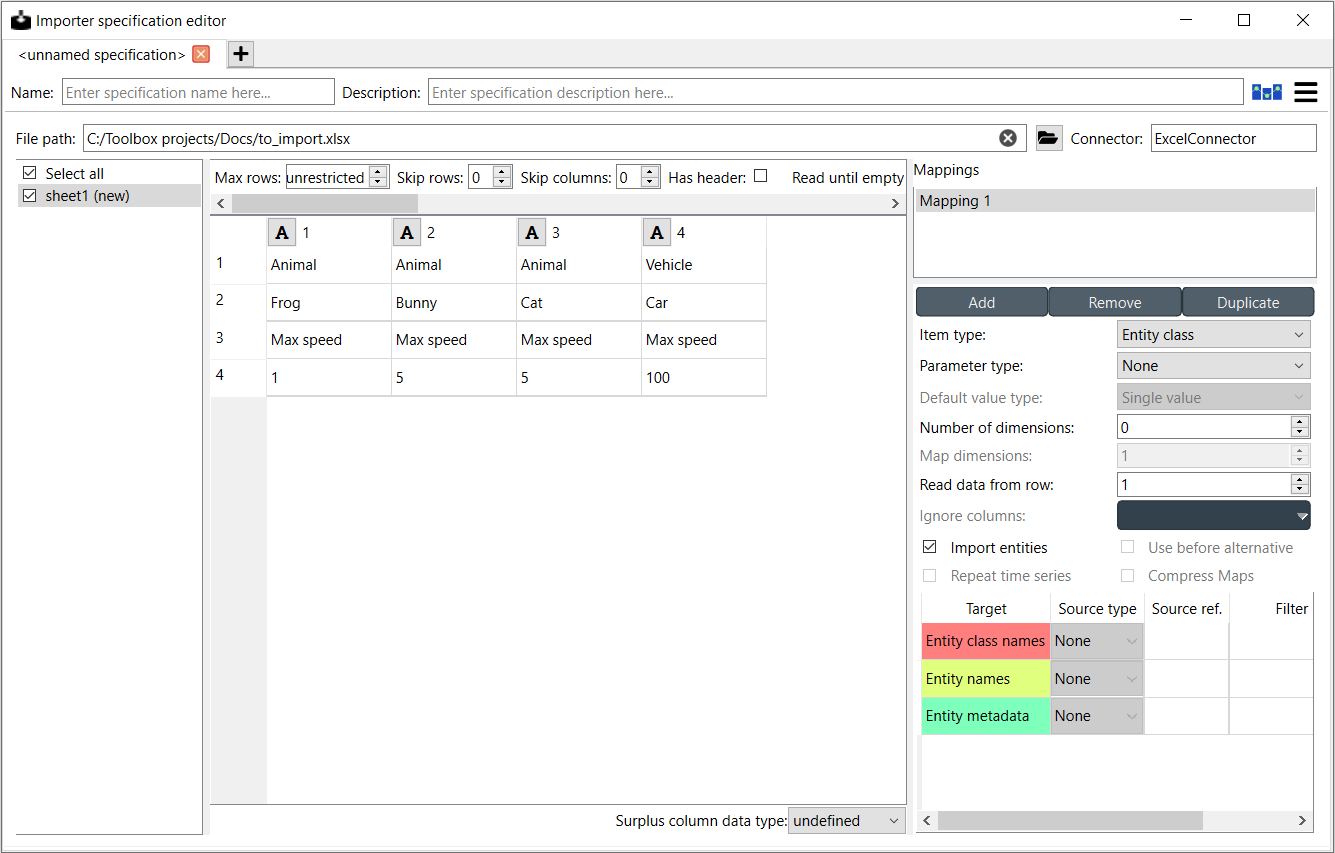
All tables available in the source selected in Input file/URL are listed in the leftmost pane. If the file does not have tables or the file type does not support them (e.g. CSV), all of the file’s data will be in a single table called ‘data’. The tables can be selected and deselected using the check boxes and only the selected ones will be imported. The option Select All is useful for selecting or deselecting all tables. If the Importer is opened in anonymous mode, there is also the option to add tables. The tables are imported in the order show on the list. The order can be changed by dragging and dropping the table names.
Tip
Multiple CSV files can be bundled into a datapackage which has its own input type in Importer. Specifically, each CSV file in the datapackage shows up as a separate table in the table list. See Packing CSV files into datapackage for more information on how to pack CSVs into a datapackage automatically within your workflow.
The image below shows different font styles used in the table:
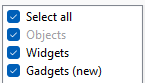
The tables that exist in the input source, such as the ‘Widgets’ table above, are shown with normal text in the list.
Tables that are defined in the specification but are missing in the source are greyed like the ‘Objects’ table.
New tables that have not been mapped before are tagged with (new).
Greyed tables can be removed by selecting them (use Shift or Ctrl to select multiple) and clicking Delete from the right-click popup menu. The Remove unavailable tables button will delete all such tables that are not found in the source.
Next to the table list, there is a small widget that allows to “format” the selected table. The available options differ depending on the selected input type. The above picture shows some of the available options for Excel files. Max rows specifies the amount of rows from the input data that are considered by the Importer. The option Has header converts the first row into headers. Skip rows and Skip columns skip the first N specified rows or columns from the table. If the table has empty rows or columns and some other data after that that you don’t want to use, Read until empty row/column on first column/row options can be used to “crop” the imported data to the first relevant block of information. Other possible options for different input types include Encoding, Delimiter, Custom Delimiter, Quotechar and Maximum Depth. Load default mapping button sets all of the selections in the spec editor to their default values. Be careful not to press this button unless you want to wipe the whole specification clean.
Note
If you are working on a specification and accidentally press the Load default mapping button you can undo previous changes for the specification from the hamburger menu or by pressing Ctrl+Z. To redo actions, or press Crl+Y.
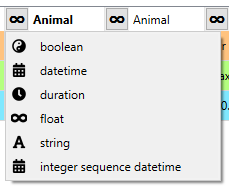
When a table is selected, its data and a preview of how the selected mapping will import the data will be presented under the options widget. An important aspect of data import is whether each item in the input data should be read as a string, a number, a time stamp or something else. In other words, the importer should know the data types of the input data. By default all input data is read as strings. However, often things like parameter values are actually numbers. Clicking the data type indicator button on column or row headers pops up a menu with a selection of available data types. Right clicking the column/row header also gives the opportunity to change the data type of all columns/rows at once. Below the preview table, the Surplus column data type allows selecting data type for the “rest” of the columns if the tables have more columns when executing the importer. This is often the case with pivoted data.
The input data should conform to the specified data type. For float (number) type the decimal separator
should be the dot ..
For datetimes such as time stamps the recommended format is ISO8601 (e.g. 2020-03-01T01:00).
If non-ISO8601 format is
detected, the importer falls back to the dateutil Python library which supports a lot of different formats.
However, it is slow and still, ambiguous formats can be interpreted wrongly.
For example, 01-03-2020 is interpreted as January 3, 2020.
If the source file is an Excel file, date cells are interpreted correctly although the way they are shown in
Excel can be ambiguous. For time durations you can use long units in the format x unit, where x is an integer
and unit is either year, month, day, hour, minute, or second. Plural forms of the unit
names can also be used. Alternative is short units
in the format xU where x is an integer and U is either Y (for year), M (for month), D (for day),
h (for hour), m (for minute), or s (for second).
Integer sequence datetimes allow converting integers into datetimes. In this case the user has to specify the
time step and time of the first integer.
Under Mappings you can manage mappings by adding new ones, removing or duplicating existing ones and reordering by dragging and dropping. Each table has its own mappings and every mapping has its own options. In Mappings you can select the mapping that you want to start modifying. Having multiple mappings for a single table allows to for example import multiple item types at the same time from a single table in a file.
Underneath Mappings there are options that help the importer get a feel for what kind of data it will be importing. The available item type options are:
- Entity class
For importing entities, relationships (multidimensional entities) and associated parameters.
- Entity group
Groups entities under a specific group entity.
- Alternative
Imports alternative names.
- Scenario
Imports scenario names.
- Scenario alternative
Builds scenarios from alternatives.
- Parameter value list
Imports parameter value lists, also known as enumerations.
- Metadata
Imports metadata name-value pairs.
- Entity metadata
Associates metadata name-value pairs with entities.
- Parameter value metadata
Associates metadata name-value pairs with parameter values.
The other available options are dependent on the Item type. Parameter type is used to specify what type of parameters, if any, the table contains. It has options Value, Definition and None. If Value or Definition is selected the value or respectively the default value type can be set from the Value drop-down list. Number of dimensions sets the number of dimensions the entity to be imported has. Map dimensions sets the number of map indexes when importing Map values. Read data from row lets you specify the row where the importer starts to read the data. Note, that this is additive to the possible Skip rows option in the table-specific options above the preview table. Ignore columns allows you to select individual columns that you want to exclude from the whole importing process. Import entity alternatives should be selected if the table contains entity alternative data. Import entities allows to import the elements of N-dimensional entities or members of entity groups. It is off by default to prevent importing invalid entries due to e.g. typos in the table. Repeat time series sets the repeat flag to true when importing time series. Compress Maps can be set to compress Map values if their leaf values can be converted to time series.
Once everything in the before mentioned options is in order, the next step is to set the mapping specification. Below the options there is the part where the decisions are made on how the input data is interpreted: which row or column contains the entity class names, parameter values, time stamps and so on. The table contains all of the targets that the selected mapping options specify. Each target has a Source type, Source ref. and Filter. Source type specifies if the data for the target is coming in the form of a column, row, table name etc. In the Source ref. section you can pinpoint the exact row, column etc. to use as the data. The available Source types and the corresponding interpretations of the Source ref. are listed in the table below. The Filter section can be used to further specify which values to include using regular expressions. More on regular expressions in section Basic Regular Expressions for Filtering.
Source type |
Source ref. |
Description |
|---|---|---|
Constant |
data |
Import the data in Source ref. |
Column |
column number/name |
Import from given column |
Row |
row number |
Import from given row; pivots the table |
Column Header |
column number |
Import specific column header |
Headers |
N/A |
Import from column headers |
Table Name |
N/A |
Import table name |
Mapping Name |
N/A |
Import mapping’s name |
Fixed |
<table name>: <row>, <col> |
Import the value in the given table cell |
Fixed |
<row>, <col> |
Same as above, <table name> is current table |
None |
N/A |
Not imported |
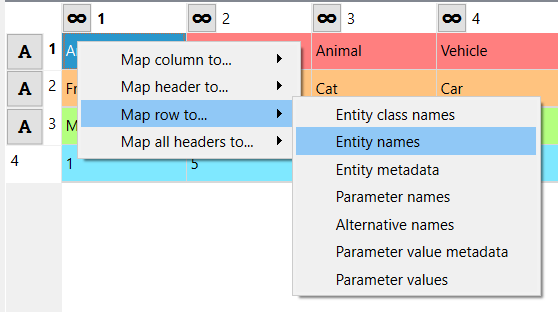
It might be helpful to fill in the Source type and Source ref. using the preview table. Right clicking on the table cells shows a popup menu that lets one to configure where the selected row/column/header is mapped to. It can also be used to simultaneously map all headers to one target.
Anonymous Mode
The importer specification editor can be opened in a mode where there is no input data available. This might be useful when creating or modifying a generalized specification. Anonymous mode can be entered when opening the specification of an Importer without incoming files or when opening the spec editor from Toolbox Main Toolbar.
In anonymous mode new tables can be created by double clicking <rename this to add table> and writing in a name for the new table. The preview will show an infinite grid of cells on which you can create different mappings.
Note
You can exit the Anonymous mode by browsing to and selecting an existing file using the controls in Input file/URL.
Exporting Data with Exporter
Exporter writes database data into regular files that can be used by Tools and external software that do not read the Spine database format. Various tabulated file formats are supported some of which require specific export settings; see below for more details.
At its heart Exporter maps database items such as entity class or entity names to an output table. Each item has a user given output position on the table, for example a column number. By default data is mapped to columns but it is also possible to create pivot tables.
Exporter also uses specifications so the same configurations
can be reused by other exporters even in other projects.
The specification can be edited in Exporter specification editor
which is accessible by the ![]() button in the item’s Properties dock
or by double clicking Exporter’s icon on the Design View.
A specification that is not associated with any specific Exporter project item can be created
and edited from the Main toolbar.
button in the item’s Properties dock
or by double clicking Exporter’s icon on the Design View.
A specification that is not associated with any specific Exporter project item can be created
and edited from the Main toolbar.
Properties Dock
Exporter’s Properties dock controls project item specific settings that are not part of the item’s specification.
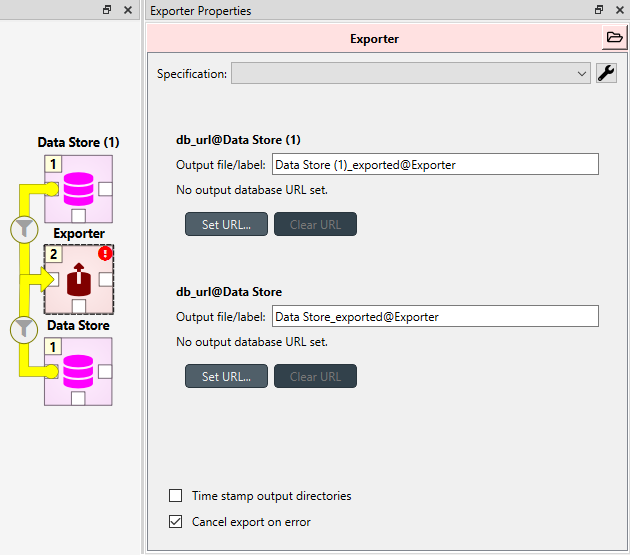
Specification used by the active Exporter item can be selected from the Specification combobox.
The ![]() button opens Exporter specification editor
where it is possible to edit the specification.
button opens Exporter specification editor
where it is possible to edit the specification.
Data Stores that are connected to the exporter and are available for export are listed below
the Specification combobox. An output label is required for each database and one Exporter
can’t have the same output label for two different Data Stores at the same time. Two different
Exporters can have the same output label names since they are located in a different directories.
The default label for the output files is of the format <name of input Data Store>_exported@<name of Exporter>.
Checking the Time stamp output directories box adds a time stamp to the item’s output directories preventing output files from being overwritten. This may be useful for debugging purposes.
The Cancel export on error checkbox controls whether execution bails out on errors that may be otherwise non-fatal.
Exporter’s data directory can be opened in system’s file browser by the ![]() button.
The output files are written in data directory’s
button.
The output files are written in data directory’s output subdirectory.
Exporter Specification Editor
Specification editor is used to create mappings that define how data is exported to the output file. Mappings define one or more tables and their contents but are otherwise output format agnostic. Some output formats, e.g. SQL and gdx, interpret the tables in specific ways, however. Other formats which inherently cannot write multiple tables into a single file, such as CSV, may end up exporting multiple files. See the sections below for format specific intricacies.
When opened for the first time Specification editor looks like in the image below. The window is tabbed allowing multiple specifications to be edited at the same time. Each tab consists of dock widgets which can be reorganized to suit the user’s needs. The ‘hamburger’ menu on the top right corner gives access to some important actions such as Save and Close. Undo and redo can be found from the menu as well. There is also a Duplicate option which creates a new tab in the spec editor that is otherwise the same but has no name and is missing the database url under Preview controls. This is handy if you want to create a new Exporter specification using an existing template instead of always starting form the beginning.
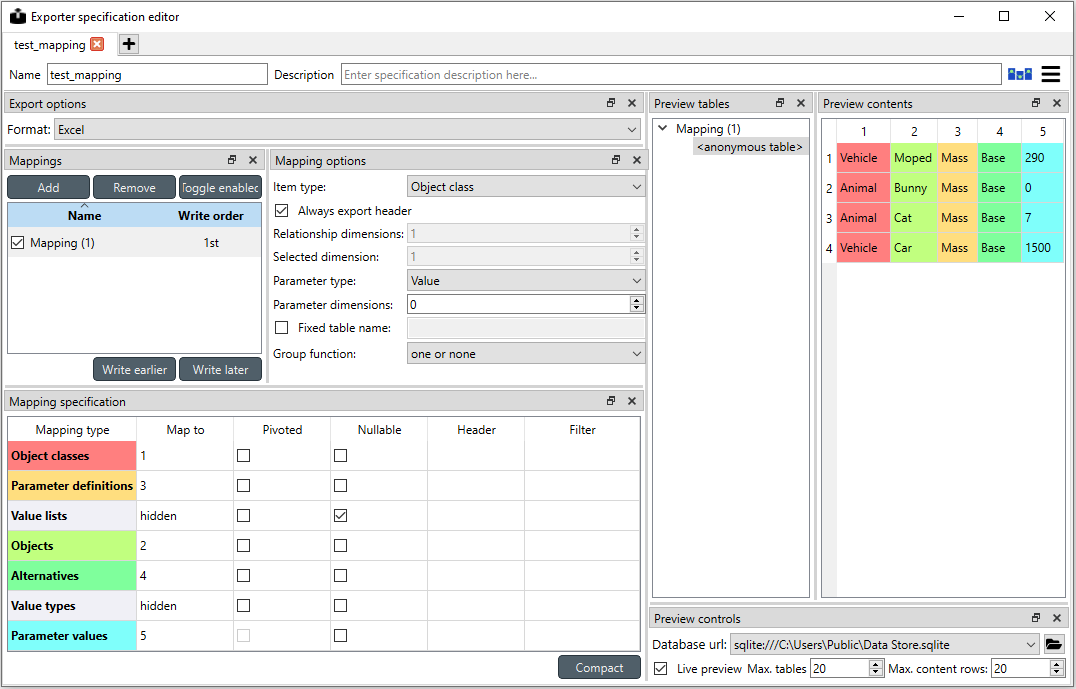
The only requirement for a specification is a name. This can be given on the Name field field on the top bar. The Description field allows for an additional explanatory text. The current output format can be changed by the Format combobox on Export options dock.
Specification’s mappings are listed in the Mappings dock widget shown below. The Add button adds a new mapping while the Remove button removes selected mappings. Mappings can be renamed by double clicking their names on the list. The checkbox in front of mapping’s name shows if the mapping is currently enabled. Only enabled mappings are exported when the Exporter is executed. Use the Toggle enabled button to toggle the enabled state of all mappings at once.
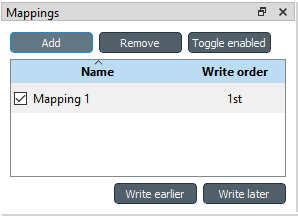
The tables defined by the mappings are written in the order shown on the mapping list’s Write order column. This may be important if the tables need to be in certain order in the output file or when multiple mappings output to a single table. Mappings can be sorted by their write order by clicking the header of the Write order column. The Write earlier and Write later buttons move the currently selected mapping up and down the list.
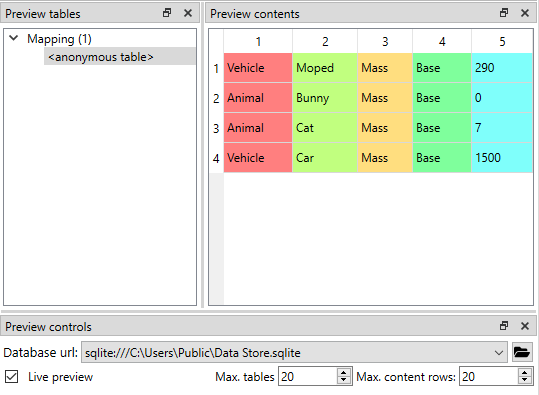
A preview of what will be written to the output is available in the preview dock widgets. To enable it, check the Live preview checkbox. A database connection is needed to generate the preview. The Preview controls dock provides widgets to choose an existing database or to load one from a file. Once a database is available and the preview is enabled the mappings and the tables they would output are listed on the Preview tables dock. Selecting a table from the list shows the table’s contents on the Preview contents dock.
Note
The preview is oblivious of any filters possibly set up in the workflow. Therefore, it may show entries, e.g. parameter values, that would be filtered out during execution.
Mapping Options
The currently selected mapping is edited using the controls in Mapping options and Mapping specification docks. The Mapping options dock contains controls that apply to the mapping as a whole, e.g. what data the output tables contain. It is important to choose Item type correctly since it determines what database items the mapping outputs and also dictates the mapping types that will be visible in the Mapping specification dock widget. Currently available item types are:
- Entity class
Exports entities, relationships (multidimensional entities) and associated parameters.
- Entity class with dimension parameter
Exports relationships (multidimensional entities) with a twist: instead of exporting the relationship’s parameters, this item type exports parameters from one of the relationship’s dimensions. The dimension is selected with the Selected dimension spin box. For example, when exporting
unit__nodewith this item type, and with dimension 1 selected, parameters fromunitclass will be exported. Selecting dimension 2 would export parameters fromnode.- Entity group
Exports entity group information.
- Alternative
Exports alternative names and descriptions.
- Scenario
Exports scenario names and descriptions.
- Scenario alternative
Exports scenarios and the alternatives they consist of.
- Parameter value list
Exports parameter value lists.
- Metadata
Exports metadata name-value pairs.
- Entity metadata
Exports metadata name-value pairs associated with entities.
- Parameter value metadata
Exports metadata name-value pairs associated with parameter values.
The rest of the options besides Group function are item type specific and may not be available for all selections.
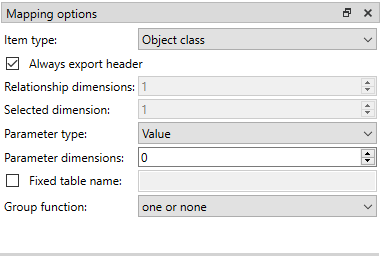
Checking the Always export header checkbox outputs a table that has fixed headers even if the table is otherwise empty. If Item type supports it, the Entity dimensions spinbox can be used to specify the maximum number of entity’s dimensions that the mapping is able to handle. Selected dimension option is only available for the Entity class with dimension parameter item type and it is used to specify the entity dimension where the entity parameters are exported from. Parameters can be outputted by choosing their value type using the Parameter type combobox. The Value choice adds rows to Mapping specification for parameter values associated with individual entities while Default value allows outputting parameters’ default values. The maximum number of value dimensions in case of indexed values (time series, maps, time patterns, arrays) the mapping can handle is controlled by the Parameter dimensions spinbox. The Fixed table name checkbox enables giving a user defined table name to the mapping’s output table. In case the mapping is pivoted and Mapping specification contains items that are hidden, it is possible that a number of data elements end up in the same output table cell. The Group function combobox offers some basic functions to aggregate such data into the cells.
Mapping Specification
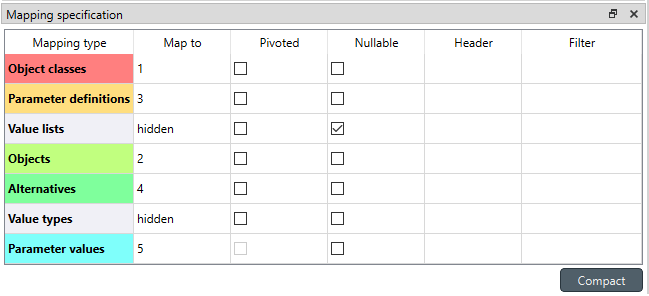
Mapping specification contains a table which defines the structure of the mapping’s output tables. Like mentioned before, the contents of the table depends on choices on Mapping options, e.g. the item type, parameter type or dimensions. Each row corresponds to an item in the database: entity class names, entity names, parameter values etc. The item’s name is given in the Mapping type column. The colors help to identify the corresponding elements in the preview.
The Map to column defines the position of the item, that is, where the item is written or otherwise used when the output tables are generated. By default, a plain integral number in this column means that the item is written to that column in the output table. From the other choices, hidden means that the item will not show on the output. Table name, on the other hand, uses the item as output table names. For example, outputting entity classes as table names will generate one new table for every entity class in the database, each named after the class. Each table in turn will contain the parameters and entities of the table’s entity class. If multiple mappings generate a table with a common name then each mapping appends to the same table in the order specified by the Write order column on Mappings dock.
The column header position makes the item a column header for a buddy item. Buddy items have some kind of logical relationship with their column header, for instance the buddy of an entity class is its entities; setting the entity class to column header will write the name of the class as the entity’s column header.
Note
Currently, buddies are fixed and defined only for a small set database items. Therefore, column header will not always produce sensible results.
Changing the column and pivot header row positions leaves sometimes gaps in the output table. If such gaps are not desirable the Compact button reorders the positions by removing the gaps. This may be useful when the output format requires such gapless tables.
The checkboxes in Pivoted column on the Mapping specification dock toggle the mapping into pivoted mode. One or more items on the table can be set as pivoted. They then act as a pivot header for the data item which is the last non-hidden item on the list. Once checked as pivoted, an item’s position column defines a pivot header row instead of output column.
By default a row ends up in the output table only when all mapping items yield some data. For example, when exporting entity classes and entities, only classes that have entities get written to output. However, sometimes it is useful to export ‘empty’ entity classes as well. For this purpose a mapping can be set as nullable in the Nullable column. Continuing the example, checking the Nullable checkbox for Entities would produce an output table with all entity classes including ones without entities. The position where entities would normally be outputted are left empty for those classes.
Besides the column header position it is possible to give fixed column headers to items using the Header column in Mapping specification dock. Note that checking the Always export header option in the Mapping options dock outputs the fixed headers even if there is no other data in a table.
The Mapping specification dock’s Filter column provides refined control on which database items the mapping outputs. The column uses regular expressions (see section Basic Regular Expressions for Filtering) to filter what gets outputted.
CSV and Multiple Tables
CSV files are flat text files and therefore do not directly support multiple tables. Instead, multiple tables are handled as separate output files.
Only mappings that output an anonymous table
actually write to the file/label specified on the Exporter’s properties dock.
Named tables get written to files named after the table plus the .csv extension.
For example, a table named node would result in a file called node.csv.
SQL Export
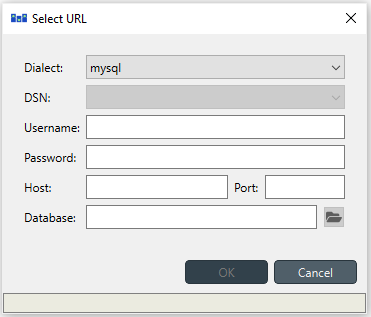
To set up export to a remote database, first an Exporter specification with SQL selected as the format needs to be saved. The Exporter needs to also be connected to some input Data Store. From the Exporters Properties dock widget an output database can be specified for each input Data Store respectively by clicking the Set URL… button. A small new window opens with a few settings to set up the output database. Currently only mysql and sqlite are supported, even though mssql, postgresql and oracle are also listed as options for the dialect. Once a URL is set it can be removed by pressing the Clear URL button on the Properties tab.
The SQL backend writes the tables to the target database in a relatively straightforward way:
Tables are named after the table name provided by the mappings. Anonymous tables are not supported.
The first row of each table is used as column names in the database. Thus, each column in a mapping should have a fixed header or a header produced by an item set to column header position.
Column data types are sniffed from the second row. Empty values or a missing row result in string type.
There must be an item assigned to each column. Empty columns confuse the SQL backend.
Pivot tables do not generally make sense with the SQL backend unless the resulting table somehow follows the above rules.
GAMS GDX Export
Note
You need to have GAMS installed to use this functionality. However, you do not need to own a GAMS license as the demo version works just as well. See Setting up Consoles and External Tools for more information.
The gdx backend turns the output tables to GAMS sets, parameters and scalars following the rules below:
Table names correspond the names of sets, parameters and scalars. Thus, anonymous tables are not supported.
There must be an item assigned to each column. Empty columns confuse the gdx backend.
Pivot tables do not generally make sense with the gdx backend unless the resulting table somehow follows the rules listed here.
Sets:
Everything that is not identified as parameter or scalar is considered a GAMS set.
Each column corresponds to a dimension.
The first row is used to name the dimension’s domain. Thus, each column in a mapping should have a fixed header or a header produced by an item set to column header position. Note that
*is a valid fixed header and means that the dimension has no specific domain.
Parameters:
A table that contains no header in the last (rightmost) column is considered a GAMS parameter.
The last column should contain the parameter’s values while the other columns contain the values’ dimension.
Dimensions’ domains are taken from the header row, see Sets above. Note, that the value column must not have a header.
Scalars:
A table that contains a numerical value in the top left cell is considered a GAMS scalar. Everything else (except the table name) is ignored.
The data in the top left cell is the scalar’s value.
The following conversions are done for GAMS special values:
GAMS special value |
Original value |
|---|---|
+Inf |
IEEE 754 infinity |
-Inf |
Negative IEEE 754 infinity |
Eps |
2.2250738585072014e-308, 1e-10 or the string |
Basic Regular Expressions for Filtering
See regular expressions on wikipedia and on Python’s documentation. Both the Exporter and Importer have applications for regular expressions in their respective Mapping specifications dock widgets. Below are examples on how to create some basic filters for these applications.
- Single item
Writing the item’s name to the field filters out all other items. For example, to output the entity class called ‘node’ only, write
nodeto the Filter field.- OR operator
The vertical bar
|serves as the OR operator.node|unitas a filter for entity classes would output classes named ‘node’ and ‘unit’.- Excluding an item
While perhaps not the most suitable task for regular expressions it is still possible to ‘negate’ a filter. As an example,
^(?!node)excludes all item names that start with ‘node’.