Adding Data
This section describes the available tools to add new data. Note that after adding data to a Spine Database, it still needs to be committed in order for the changes to take effect beyond just the current session in the Spine Database Editor. More information about this in the chapter Committing and History.
Adding Entity Classes
From Entity Tree
Right-click on the root item in Entity Tree to display the context menu, and select Add entity classes.
The Add entity classes dialog will pop up:

Select the number of dimensions using the spinbox at the top. The amount of dimensions determines the number of dimension names that need to be selected. With 0-dimensional classes, like in the image above, only the name of the created entity class is required. The class’s name is to be entered below the header entity class name. In other cases like in the image below, in addition to the created classes name, also the classes making up the new class need to be selected:

They need to be filled under the headers dimension name (1) through dimension name (N) where N is the selected dimension. Note that because of this, there needs to be at least N entity classes already defined in the database when creating an N dimensional entity class. To display a list of available classes, start typing or double click on the cell below the header. Optionally, you can enter a description for each class under the description header. Double clicking the cell under the header display icon will open up the icon editor where the visual representation of the class can be modified:
This editor can also be opened by right clicking on the corresponding cell and selecting Open display icon editor. From the right click context menu, the display icon id can also be copied. This might be useful if there is a need to have multiple classes use the same icon, since the value can just be pasted into the cells.
The boolean value of active by default will determine whether the entities created under the created class will have the value under entity alternative set as true or false by default. Finally, select the databases where you want to add the entity classes under databases.
Multiple additions can be at once. When some information is inserted into the preceding row, a new empty row will appear in the dialog where a new class with the same dimensions can be defined. Delete entire rows from the dialog with Remove selected rows. When you’re ready, press Ok to make the additions.
Tip
All the Add… dialogs support pasting tabular (spreadsheet) data from the clipboard. Just select any cell in the table and press Ctrl+V. If needed, the table will grow to accommodate the exceeding data. To paste data on multiple cells, select all the cells you want to paste on and press Ctrl+V.
Adding Entities
From Entity Tree or Graph View
There are several different ways to add entities to an existing entity class. The easiest way is to click on the
(![]() ) -button next to an entity class. The other ways are to
right-click on the class or root item in Entity Tree and select Add entities, or click on an empty space
in the Graph View and select Add entities… from the context menu.
) -button next to an entity class. The other ways are to
right-click on the class or root item in Entity Tree and select Add entities, or click on an empty space
in the Graph View and select Add entities… from the context menu.
All of these methods will open up the Add entities dialog:

Select the class where you want to add the entities from Entity class. It will list all of the entity classes. To narrow down the list, instead of opening the dialog from the root item, open it from a specific entity class item in the Entity Tree. This way the class will be preselected from the list and the list will overall only contain other classes that are relevant to the selected class.
Enter the names of the entities under entity name. The column alternative is optional. It defaults to the first alternative in the Alternative dock widget (normally Base will automatically set the entity active in the selected alternative. The cell under entity group is also optional. By filling it, the entity will be automatically added to the group that is specified in the cell. If the entity group doesn’t exist, it will also be created. Finally, select the databases where you want to add the entities under databases. When you’re ready, press Ok. Rows can once again be deleted with the Remove selected rows -button.
With N-D entity classes, the elements need to be specified. After defining the elements the entity’s name can be modified:

New entities for an existing N-D entity class can also be created easily from the Graph view. Make sure all the entities you want as members in the new entity are in the graph. To start the new N-D entity, either double click on one of the entity items in the graph, or right click on it to display the context menu, and choose the class from Connect entities. After selecting the class the mouse cursor will adopt a cross-hairs shape.
When hovering over a entity item, the cursor will aid by indicating an entity that can’t be a member by turning into a red restriction -sign. When nearly all of the selections made and only the last member needs to be selected, the cursor will turn into a green checkmark when hovering over an appropriate entity. Click on each of the remaining member entities one by one to add them to the new entity. Once you’ve added enough members for the entity class, a dialog will pop up. In the dialog, all of the possible permutations of the selected members are presented. Check the boxes next to the entities you want to add, and press OK.
From Pivot View
To add an entity to a specific 0-D entity class, bring the class to Pivot View using either Value or Index (see Using Pivot View and Frozen Table). There under the class name just type a new name and the new entity will be added under the class. Note that is only possible to add 0-D entities this way even if you have selected an N-D class from the Entity Tree.
To enter a new entity to an N-D class, select the Element -view from the Toolbar. This view contains all of the possible combinations of elements in the selected class. The entities can be added by checking the boxes and removed by unchecking them.
From Table View
It is possible to create new entities on the fly while adding new parameter values or entity alternatives. Just fill in the empty row of Parameter value or Entity alternative with the information that you want to add and the new entities will automatically be added to the correct class, if one doesn’t already exist. Afterwards, a popup window will be shown that contains all the newly added entities. The popup can be quickly closed by pressing Enter, Esc or just by clicking OK. The automatic adding of entities works with entities of any dimension, but all of the elements of the new entity must already be present in the database.
Duplicating Entities
To duplicate an existing entity with all its parameter values and other associated data, right-click over the corresponding entity item in Entity Tree to display the context menu, and select Duplicate entity. The new entity will have the same name with an added (1) to indicate that it is a copy of the original entity. It can be renamed to be something else afterwards.
Adding Entity Groups
Right-click on an entity class item in Entity Tree, and select Add entity group from the context menu.
The Add entity group dialog will pop up:

Enter the name of the group, and select the database where you want the group to be created.
Select the members under Non members, and press (![]() >>) to add the members and (
>>) to add the members and (![]() <<) to remove them.
Multiple selection is supported with Ctrl and Shift. Finally press OK to create the group.
<<) to remove them.
Multiple selection is supported with Ctrl and Shift. Finally press OK to create the group.
When you’re happy with your selections, press OK to add the group to the database.
Adding Parameter Definitions
From Table View
To add new parameter definitions for an entity class, just fill the empty row of Parameter definition. Only two of the fields are required when creating a new parameter definition: class and parameter name. Enter the name of the class under class. To display a list of available entity classes, start typing in the empty cell or double click it. For the name of the parameter choose something that isn’t already defined for the specified entity class. Optionally, you can also specify valid value types, a parameter value list, a default value and a description.
The valid types column defines value types that are valid for the parameter. An empty field means that all types are valid. All values are validated against this column and non-valid types are marked invalid in the default value and value (in Parameter value table) columns. Valid types are not enforced, however, so it is still possible to commit values of invalid type to the database.
In the column value list a name for a parameter value list can be selected. Leaving this field empty means that later on when creating parameter values with this definition, the values are arbitrary. Meaning that the value could for example be a string or an integer. When the parameter value list is defined in the parameter definition, only the values in the list will be allowed to be chosen. For the creation of parameter value lists, see Adding Parameter Value Lists.
In the default value field, the default value can be set. The default value can be used in cases where the value is not specified. The usage of default value is really tool dependent, meaning that the Spine Database Editor doesn’t use the information of the default value anywhere, but it is instead left to the tool creators on how to utilize the default value.
A short description for the parameter can be written in the description column.
A parameter can be a member of parameter group which can be selected in the group column.
The parameter is added when the row “jumps” to the existing parameter table above and the background of the cells under class and database become gray.
From Pivot View
To add a new parameter definition for a class, bring the corresponding class to Pivot View using the Value input type (see Using Pivot View and Frozen Table). The parameter header of Pivot View will be populated with existing parameter definitions for the class. Enter a name for the new parameter in the last cell of that header.
Adding Parameter Values
From Table View
To add new parameter values for an entity, just fill the empty row of the Parameter value table. Enter the name of the class under class, the name of the entity under entity byname, the name of the parameter under parameter name, and the name of the alternative under alternative. Optionally, you can also specify the parameter value right away under the value column. The database where the value will be added to is displayed in the last column of the table (if multiple databases open at once). To display a list of available entity classes, entities, parameters, or alternatives, just start typing or double click under the appropriate column. The parameter value is added when the row “jumps” to the existing values table above and the background of the cells under class and database become gray.
Note
To add parameter values for an entity, the entity doesn’t have to exist beforehand. If the entity in question is one dimensional, you can just type in a new name into the cell under entity byname. If the entity in question has more dimensions, you can specify any valid combination of elements by double clicking the cell, which opens up the Select elements dialog. In both cases, the specified entity will be created if it doesn’t yet exist.
From Pivot View
To add parameter value for any entity, bring the corresponding class to Pivot View using the Value input type (see Using Pivot View and Frozen Table). Then, enter the parameter value in the corresponding cell in the table body.
Tip
All Tables Views and Pivot Views support pasting tabular (e.g., spreadsheet) data from the clipboard. Just select any cell in the table and press Ctrl+V. If needed, Table Views will grow to accommodate the exceeding data. To paste data on multiple cells, select all the cells you want to paste on and press Ctrl+V.
Adding Entity Alternatives
To add an entity alternative, open the Entity Alternative Table View. There under class select the class. Under entity byname select the specific entity from that class and from alternative select the alternative. Then set the value of the active column to either true or false by double clicking it. The row “jumps” to the table for existing entity alternatives above and the background of the cells under class and database become gray, indicating that the entity alternative has been added.
Tip
Like with the parameter values, new entities can be created on the fly by filling out the cell below entity byname with either text or a valid combination of elements.
Adding Alternatives
From Alternative
To add a new alternative, just select the last item under the appropriate database, and enter the name of the new alternative.
You can also copy and paste alternatives between different databases.
From Pivot View
Select the Scenario input type (see Using Pivot View and Frozen Table). To add a new alternative, enter a name in the last cell of the alternative header.
Adding Scenarios
From Scenario Tree
To add a new scenario, just select the last item under the appropriate database, and enter the name of the scenario.
Note
As noted in the tooltip of the last item, scenario names longer than 20 characters may become shortened in generated files. This can happen for example when exporting the scenarios using the Exporter project item. This can lead to confusion later on if the first 20 characters of the scenario names are identical. Therefore it is recommended to have a unique identifier for each scenario in the first 20 characters of its name.
To add alternatives for a particular scenario, right click the scenario and point the mouse to Add alternatives which opens a submenu showing available alternatives. For example, selecting “Base” from the first submenu, as shown in the image below, adds the Base alternative to Baseline:
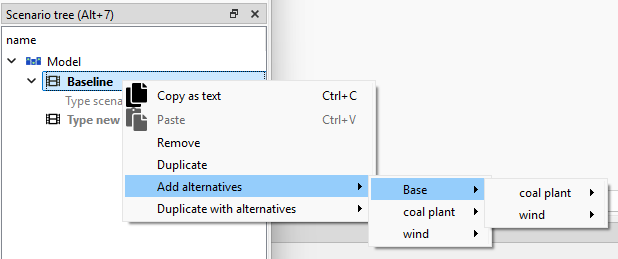
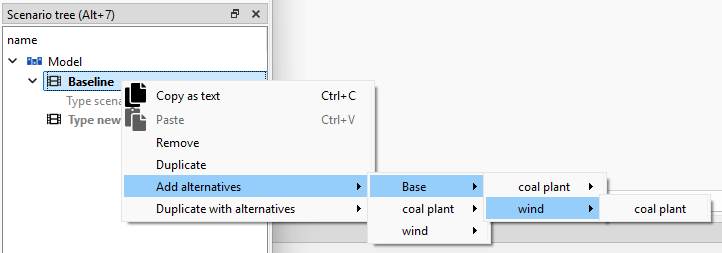
Further, selecting “wind” from the second submenu add both Base and wind, in that order, to the scenario:
Another option to add an alternative is to drag the alternative item from Alternative and drop it under the corresponding scenario. The position where you drop it determines the alternative’s rank within the scenario. Alternatives lower in the list have higher rank. Alternatives can also be copied from Alternative and pasted at the appropriate position in Scenario Tree.
Note
Alternatives lower in the scenario’s alternative list have priority (have higher rank) when determining the parameter value for a certain scenario. If the parameter value is specified for two alternatives, and both of them happen to coexist in a same scenario, the value from the alternative that has higher rank takes precedence.
From Pivot View
Select the Scenario input type (see Using Pivot View and Frozen Table). To add a new scenario, enter a name in the last cell of the scenario header.
From Generate scenarios
Scenarios can be added also by automatically generating them from existing alternatives. Select the alternatives in Alternative (using Ctrl and Shift while clicking the items), then right click to open a context menu. Select Generate scenarios…

Give the scenario names a prefix. An index will be appended to the prefix automatically: prefix01, prefix02,… Select appropriate operation from the Operation combo box. Checking the Use base alternative check box will add the selected alternative to all generated scenarios as the lowest rank alternative. The Alternative by rank list allows reordering the ranks of the alternatives.
Duplicating scenarios
The Duplicate action in the right-click popup menu in Scenario tree duplicates the selected scenarios.
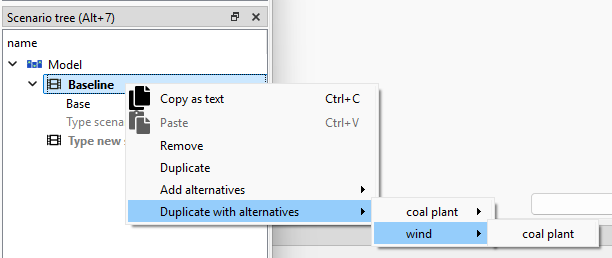
The Duplicate with alternatives action, on the other hand, duplicates the current scenario adding the selected alternatives to the duplicate. For example, selecting the “wind” alternative from the first submenu as show in the screenshot below creates a new scenario called “Baseline+wind” that has Base and wind alternatives.
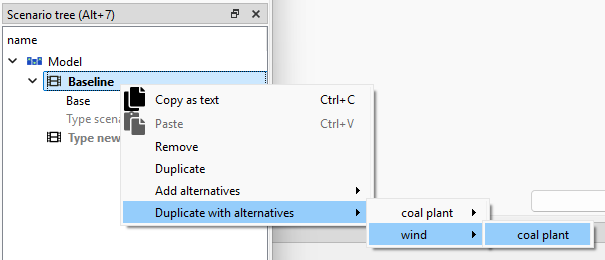
Selecting “coal plant” in the next submenu creates a scenario called “Baseline+wind+coal plant” with Base, wind and coal plant alternatives:
Adding Parameter Value Lists
To add a new parameter value list, go to Parameter Value List and select the last item under the appropriate database, and enter the name of the list.
To add new values for the list, expand the list with the right-arrow and select the last empty item under the corresponding list item, and enter the value. To enter a complex value, right-click on the empty item and select Edit… from the context menu to open the value editor.
Note
To be actually added to the database, a parameter value list must have at least one value.
Adding Metadata and Item Metadata
To add new metadata go to Metadata and add a new name and value to the last row.
To add a new link metadata for an item, select an entity from one of the entity trees or a parameter value from one of the parameter value tables. Then go to Item metadata and select the appropriate metadata name and value on the last row.
Adding Parameter Groups
To add a new parameter group go to Parameter group and fill in the empty rows.