Setting up External Tools
This section describes how to set up Python, Julia, GAMS, and SpineOpt.jl for Spine Toolbox.
Executing Python or Julia Tools requires that Python or Julia are installed on your system. You can download Python from https://www.python.org/downloads/ and Julia from https://julialang.org/downloads/. In addition, you need an installation of GAMS to execute GAMS Tools and Exporter project items. GAMS can be downloaded from https://www.gams.com/download/.
Setting up Python
If you encounter the following message in Event Log when trying to execute a Python Tool.:
Couldn't determine Python version. Please check the Python interpreter option in Settings.
After reading this section, you should know what this message means and how to set up Python for Spine Toolbox so you can successfully execute Python Tools.
There are two ways you can install Spine Toolbox.
- Clone Spine Toolbox repository from https://github.com/Spine-project/Spine-Toolbox, checkout the branch you want and follow installation instructions on the page (README.md).
- [On Windows] Use a single-file installation bundle (e.g. spine-toolbox-0.4.0-x64.exe). These are available for download in [Spine Toolbox Release Archive]
If you go with option 1, and you have successfully started the application, you already have a Python that can be used in executing Python Tools. If you go with option 2, you need to have a Python installed on your system to be able to execute Python Tools. You can select the Python you want to use on the Tools tab in Settings (See Settings).
The Python interpreter you select here is the Python that is used when executing Python Tools with or without the Embedded Python Console.
The default Python interpreter is the Python that is in your PATH environment variable. If you do not
have Python in your PATH, you can explicitly set the Python you want to use by clicking on the ![]() button and selecting the Python interpreter file (python.exe on Windows). Note that you can use any
Python in your system by setting a Python interpreter here.
button and selecting the Python interpreter file (python.exe on Windows). Note that you can use any
Python in your system by setting a Python interpreter here.
Note
Embedded Python Console supports Python versions from 2.7 all the way to latest ones (3.8). Executing Python Tools without using the embedded Python Console possibly supports even earlier Pythons than 2.7. You can start Spine Toolbox only with Python 3.6 or with 3.7, but you can still set up an embedded Python Console into Spine Toolbox that uses e.g. Python 2.7. This means, that if you still have some old Python 2.7 scripts lying around, you can incorporate those into a Spine Toolbox project and execute them without any modifications.
Step-by-step instructions
You can either execute Python Tools in the embedded Python Console or as in the shell. Here are the step-by-step instructions for setting up Spine Toolbox for both.
Shell execution
- Go to https://www.python.org/downloads/ and download the Python you want
- Run the Python installer and follow instructions
- Either let the installer put Python in your PATH or memorize the path where you installed it (e.g. C:\Python38)
- Start Spine Toolbox
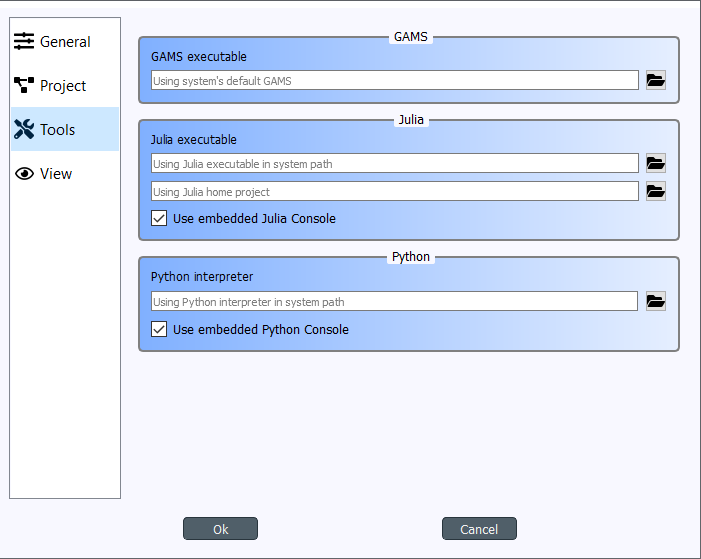
- Go to File -> Settings (or press F1) and click the Tools tab open
- If the installed Python is now in your PATH, you can leave the Python interpreter line edit blank.
Or you can set the Python interpreter explicitly by setting it to e.g. C:\Python38\python.exe
by using the
 button.
 - Uncheck the Use embedded Python Console check box
- Create a project with a Tool and a Python Tool specification (See Getting Started)
- Press play to execute the project (See Executing Projects)
- Executing your Tool project item starts. You can see the output (stdout and stderr) in the Process Log.
Python Console execution
If you want to use the embedded Python Console (and you should). There is an extra step involved since the Python Console requires a couple of extra packages (ipykernel and its dependencies) to be installed on the selected Python. In addition, kernel specifications for the selected Python need to be installed beforehand. Spine Toolbox can install these for you automatically.
- Go to https://www.python.org/downloads/ and download the Python you want
- Run the Python installer and follow instructions
- Either let the installer put Python in your PATH or memorize the path where you installed it (e.g. C:\Python38)
- Start Spine Toolbox
- Go to File -> Settings (or press F1) and click the Tools tab open
- If the installed Python is now in your PATH, you can leave the Python interpreter line edit blank.
Or you can set the Python interpreter explicitly by setting it to e.g. C:\Python38\python.exe
by using the button.
- Check the Use embedded Python Console check box
- Create a project with a Tool and a Python Tool specification (See Getting Started)
- Press play to execute the project (See Executing Projects)
- You will see a question box
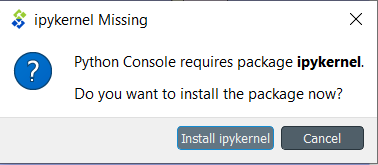
When you click on the Install ipykernel button, you can see the progress of the operation in Process Log. The following packages will be installed on your selected Python.:
backcall, colorama, decorator, ipykernel, ipython, ipython-genutils, jedi, jupyter-client,
jupyter-core, parso, pickleshare, prompt-toolkit, pygments, python-dateutil, pywin32, pyzmq, six,
tornado, traitlets, wcwidth
When this operation finishes successfully, you will see another guestion box.
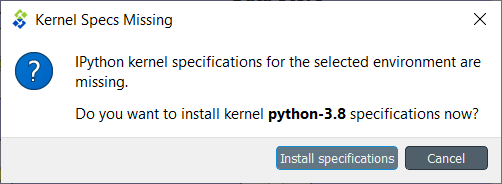
Clicking on Install specifications button starts installing the kernel specs for the selected Python. On the tested system, this creates a new kernel into directory C:\Users\ttepsa\AppData\Roaming\jupyter\kernels\Python-3.8, which contains the kernel.json file required by the embedded Python Console (which is actually a jupyter qtconsole)
- After the kernel specs have been installed, executing your Tool project item starts in the Python Console immediately. You can see the executed command and the Tool output in the Python Console.
Note
If you want to set up your Python environment ready for Python Console manually, the following commands are executed by Spine Toolbox under the hood
This installs all required packages:
python -m pip install ipykernel
And this installs the kernel specifications:
python -m ipykernel install --user --name python-3.8 --display-name Python3.8
What about Anaconda and Miniconda Pythons?
If you installed Spine Toolbox on a Conda environment, the Python you started Spine Toolbox with has been added to the conda environment variables. This means that you are ready to execute Python Tools without using the embedded Python Console out of the box. For setting up the Python Console you just need to let Spine Toolbox install the ipykernel package and the kernel specifications for this Python. See section Python Console execution above for more info.
Setting up Julia
Spine Toolbox requires a Julia installation that must be set up before Julia Tools can be executed. The basic idea is the same as with Python. In File->Settings (Tools tab), there’s a line edit for the Julia executable. If you leave this blank, Spine Toolbox uses the Julia that is in your PATH environment variable. Setting an explicit path to a Julia executable (e.g. C:\Julia-1.2.0\bin\julia.exe) overrides the Julia in PATH. As with Python Tools, you execute Julia Tools in the embedded Julia Console or without it (shell execution).
If you see this (or similar) message in Event Log when trying to execute a Julia Tool.:
julia.exe failed to start. Make sure that Julia is installed properly on your computer.
This means that you either don’t have a Julia installation on your system, Julia is not set up in your PATH environment variable or the Julia executable you have set in Settings is not valid.
Step-by-step instructions
Shell execution
- Go to https://julialang.org/downloads/ and download the Julia you want
- Run the Julia installer and follow instructions
- Either let the installer put Julia in your PATH or memorize the path where you installed it (e.g. C:\Julia-1.2.0)
- Start Spine Toolbox
- Go to File -> Settings (or press F1) and click the Tools tab open
- If the installed Julia is now in your PATH, you can leave the Julia executable line edit blank.
Or you can set the Julia executable explicitly by setting it to e.g. C:\Julia.1.2.0\bin\julia.exe
by using the button.
- Uncheck the Use embedded Julia Console check box
- Create a project with a Tool and a Julia Tool specification (See Getting Started)
- Press play to execute the project (See Executing Projects)
- Executing your Tool project item starts. You can see the output (stdout and stderr) in the Process Log.
Julia Console execution
Like the Python Console, Julia Console requires some extra setting up. Spine Toolbox can set this up for you automatically.
If you want to use the embedded Julia Console (and you should). There is an extra step involved since the Julia Console requires a couple of extra packages (IJulia, etc.) to be installed and built.
- Go to https://julialang.org/downloads/ and download the Julia you want
- Run the Julia installer and follow instructions
- Either let the installer put Julia in your PATH or memorize the path where you installed it (e.g. C:\Julia-1.2.0)
- Start Spine Toolbox
- Go to File -> Settings (or press F1) and click the Tools tab open
- If the installed Julia is now in your PATH, you can leave the Julia executable line edit blank.
Or you can set the Julia executable explicitly by setting it to e.g. C:\Julia.1.2.0\bin\julia.exe
by using the button.
- Check the Use embedded Julia Console check box
- Create a project with a Tool and a Julia Tool specification (See Getting Started)
- Press play to execute the project (See Executing Projects)
- You will see a question box
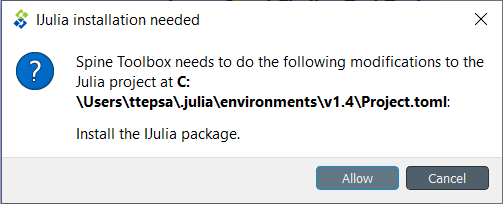
When you click on the Allow button, installing IJulia starts and you can see the progress of the operation in Process Log. This may take a few minutes.
When you see the these messages in the Event Log, the Julia Console is ready to be used.:
IJulia installation successful.
*** Starting Julia Console ***
- After the installation has finished, executing your Julia Tool project item starts in the
Julia Console immediately. You can see the executed command and the Tool output in the Julia
Console. If nothing seems to be happening in the Julia Console. Just click
 button and
then try executing the project again by clicking the
button and
then try executing the project again by clicking the  button.
Note
If you want to set up your Julia environment ready for Julia Console manually, you need to install IJulia and the Julia kernel specifications.
Setting up GAMS
Executing a GAMS Tool project item or executing an Exporter project item requires a GAMS installation on your system.
Note
You do not need to own a GAMS license as the demo version works just as well.
Note
The bitness (32 or 64bit) of GAMS has to match the bitness of the Python interpreter.
If you have GAMS in your PATH environment variable, you can leave the GAMS executable line edit in File->Settings blank and Spine Toolbox will find it. You can also override the GAMS in your PATH by setting an explicit path to the GAMS executable (e.g. C:\GAMS\win64\28.2\gams.exe) line edit.
Setting up SpineOpt.jl
There’s a built-in configuration assistant in Spine Toolbox that downloads and configures SpineOpt.jl automatically. You can find the configuration assistant in the main window menu File->Tool configuration assistants…->SpineOpt.jl Before you run this, you need to set up Julia for Spine Toolbox. See instructions above (Setting up Julia). After a Julia has been set up correctly, run the Tool configuration assistant and follow the instructions given.