Importing and exporting data
This section explains the different ways of importing and exporting data to and from a Spine database.
Importing data with Importer
Data importing is handled by the Importer project item which can import tabulated and to some degree tree-structured data into a Spine database from various formats. The same functionality is also available in Spine database editor from File->Import but using an Importer item is preferred because then the process is documented and repeatable.
Tip
A Tool item can also be connected to Importer to import tool’s output files to a database.
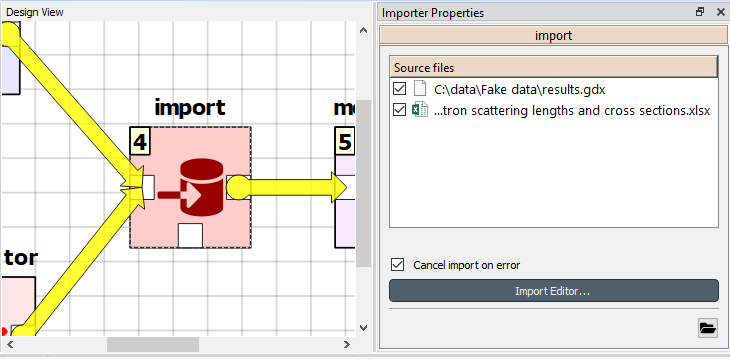
The heart of Importer is the Import Editor window in which the mappings from source data to Spine database entities are set up. The editor window can be accessed by the Import Editor… button in Importer’s Properties tab. Note, that you have to select one of the files in the Source files list before clicking the button.
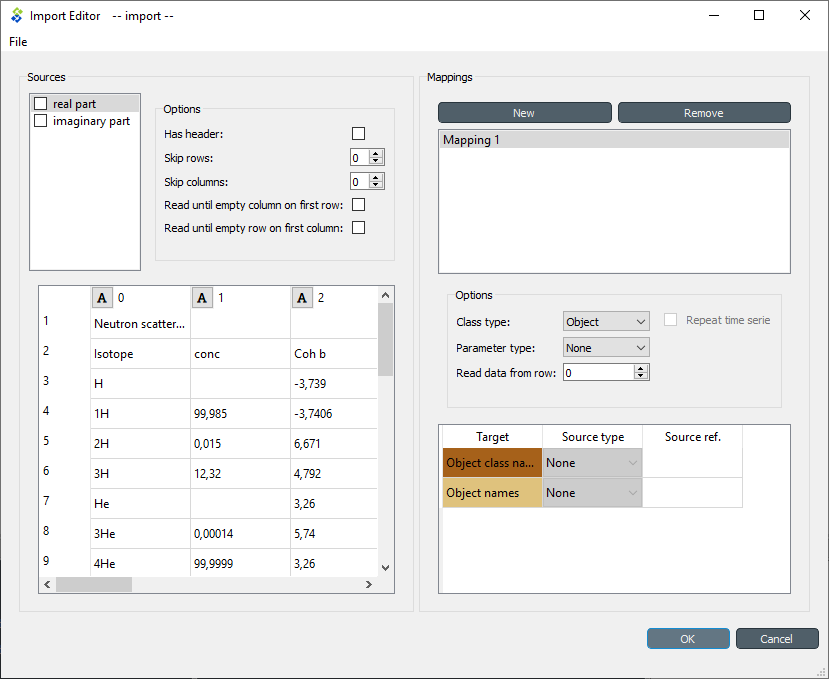
The Import Editor windows is divided into two parts: Sources shows all the ‘sheets’ contained in the file, some options for reading the file correctly, and a preview table to visualize and configure how the data on the selected sheet would be mapped. Mappings, on the other hand, shows the actual importing settings, the mappings from the input data to database entities.
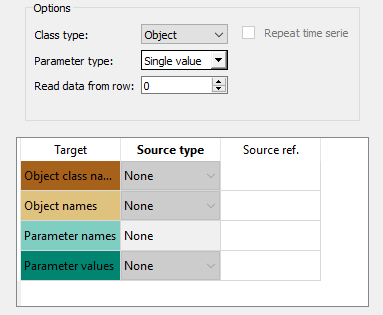
The options in the Mappings part declare if the currently selected sheet will be imported as an object or relationship and what type of parameters, if any, the sheet contains. The table can be used to configure how the input data is interpreted: which row or column contains the entity class names, parameter values, time stamps and so on.
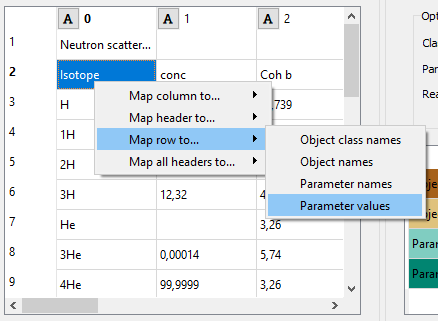
It might be helpful to fill in the mapping options using the preview table in the Sources part. Right clicking on the table cells shows a popup menu that lets one to configure how the rows and colunms are read upon importing.
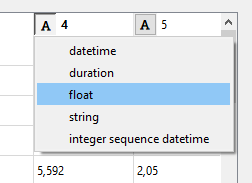
An important aspect of data import is whether each item in the input data should be read as a string, a number, a time stamp, or something else. By default all input data is read as strings. However, more often than not things like parameter values are actually numbers. It is possible to control what type of data each column (and, sometimes, each row) contains from the preview table. Clicking the data type indicator button on column headers pops up a menu with a selection of available data types. Right clicking the column header also gives the opportunity to change the data type of all columns at once.
Exporting to GAMS
Note
You need to have GAMS installed to use this functionality. However, you do not need to own a GAMS license as the demo version works just as well.
Note
The bitness (32 or 64bit) of GAMS has to match the bitness of the Python interpreter.
Databases can be exported to GAMS .gdx files by the Exporter project item.
When a project is executed, Exporter writes its output files to its data folder
and forwards file paths to project items downstream.
If a Tool is to use such a file, remember to add the file as one of the Tool specification’s input files!
The mapping between entities in a Spine database and GAMS is as follows:
| Database entity | GAMS entity |
|---|---|
| Object class | Universal set (or domain) |
| Object | Universal set member |
| Object parameter | Parameter |
| Relationship class | Subset of universal sets |
| Relationship | Subset member |
| Relationship parameter | Parameter |
Note
Currently, it is not possible to use subsets (relationship classes) as dimensions for other subsets due to technical limitations. For example, if there is a domain A(*) and a subset foo(A), a subset of foo has to be expressed as bar(A) instead of bar(foo).
It is also possible to designate a single object class as a Global parameter. The parameters of the objects of that class will be exported as GAMS scalars.
Some GAMS models need their data to be in a specific order in the .gdx.
This is not directly supported by the database.
Rather, user has to specify the desired exporting order using the Exporter item’s settings.
Exporter Project Item
The image below shows the settings tab of Exporter with two Data Sources connected to it.
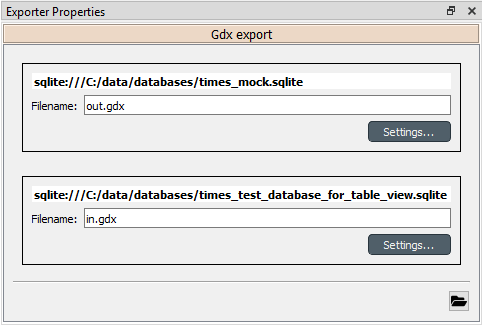
For each connected Data Store a box with the database’s URL and export file name field is shown on the tab. The Settings… buttons open Gdx Export settings windows to allow editing database specific export parameters such as the order in which entities are exported from the database.
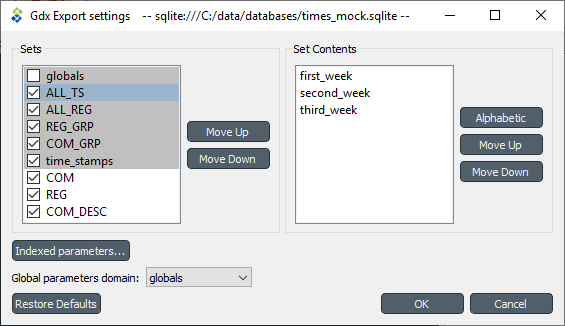
The Gdx Export settings window (see above) contains a Sets list which shows all GAMS sets (gray background) and subsets that are available in the database. The sets are exported in the order they are shown in the list. The Move Up and Move Down buttons can be used to move the selected set around. Note that you cannot mix sets with subsets so all sets always get exported before the subsets.
The checkbox next to the set name is used to control which sets are actually exported. Note that it is not possible to change this setting for certain sets. Global parameters domain is never exported, only its parameters which become GAMS scalars. Further, sets created for Indexed paramaters are always exported.
The Set Contents box lists the members of the selected set or subset. Their order of export can be changed the same way as with sets by Move Up and Move Down. The Alphabetic button sorts the members alphabetically.
Time series and time patterns cannot be exported as-is. They need to be tied up to a GAMS set. This can be achieved from the window that opens from the Indexed parameters… button. See the Exporting time series and patterns section below for more information.
Finally, one of the sets can be designated as the global parameter set. This is achieved by choosing the set’s name in the Global parameters domain box. Note that this set is not exported, only its parameters are. They end up as GAMS scalars.
Exporting time series and patterns
Since GAMS has no notion of time series or time patterns these types need special handling when exported
to a .gdx file. Namely, the time stamps or time periods (i.e. parameter indexes) need be available
as GAMS sets in the exported file. It is possible to use an existing set or create a new one for this purpose.
The functionality is available in Gdx Parameter Indexing Settings window
accessible from the Indexed Parameters… button.
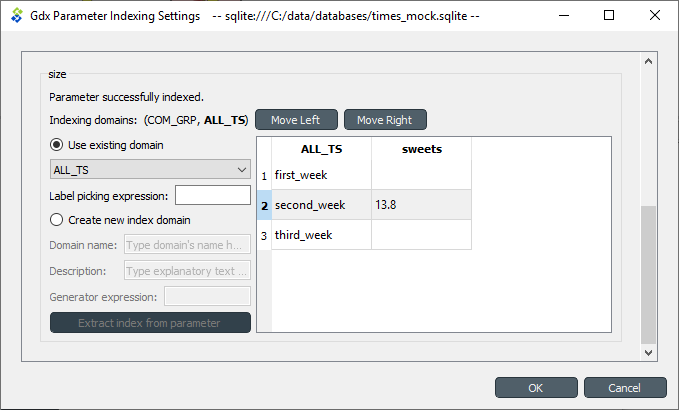
The above figure shows the indexing settings when an existing GAMS set is used to replace the original time stamps of a time series in a parameter called ‘size’. The choice between using an existing set or creating a new one can be changed by the Use existing domain and Create new index domain radio buttons. When using an existing set it is selected by the combo box. In the above figure, ALL TS set is used for indexing.
In case of existing set it is possible that not all the set’s contents are used for indexing. The table occupying the right side of the above figure shows which of the set’s keys index which parameter values. The first column contains the keys of the currently selected set whereas the other columns contain the parameter’s values, one column for each object that has the parameter. Selecting and deselecting rows in the table changes the indexing as only the keys on selected rows are used to index the parameter. Shift, ctrl and ctrl-A help in manual selection. If the selected indexes have certain pattern it might be useful to utilize the Label picking expression field which selects the set keys using a Python expression returning a boolean value. Some examples:
| Expression | Effect |
|---|---|
i == 3 |
Select the third row only |
i % 2 == 0 |
Select even rows |
(i + 1) % 2 == 0 and i != 9 |
Select odd rows except row 9 |
The Indexing domains list allows to shuffle the order of the parameter’s dimensions. The bold dimension is the new dimension that is added to the parameter. It can be moved around by the Move Left and Move Right buttons.
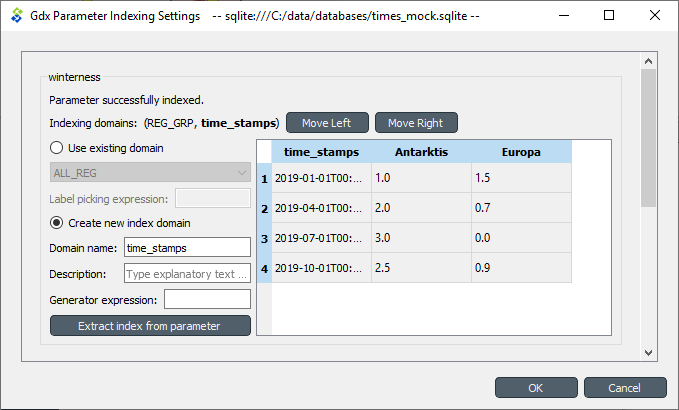
It is possible to create a new indexing set by choosing Create new index domain as shown in the figure above. Domain name is mandatory for the new domain. A Description can also be provided but it is optional. There are two options to generate the index keys: extract the time stamps or time periods from the parameter itself or generate them using a Python expression. The Extract index from parameter button can be used to extract the keys from the parameter. The Generator expression field, on the other hand, is used to generate index keys for the new set. The expression should return Python object that is convertible to string. Below are some example expressions:
| Expression | Keys |
|---|---|
i |
1, 2, 3,… |
f"{i - 1:04}" |
0000, 0001, 0002,… |
f"T{i:03}" |
T001, T002, T003,… |