Tool template editor
This section describes how to make a new Tool template and how to edit existing Tool templates.
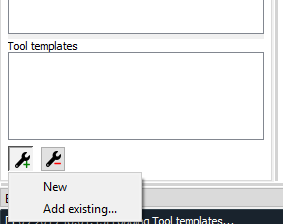
To execute a Julia, Python, GAMS, or an executable script in Spine Toolbox, you must first create a Tool template to your project. You can open the Tool template editor in several ways. One way is to press the Tool icon with a plus button in the Project dock widget. This presents you a pop-up menu with the New and Add existing… options.
When you click on New the following form pops up.
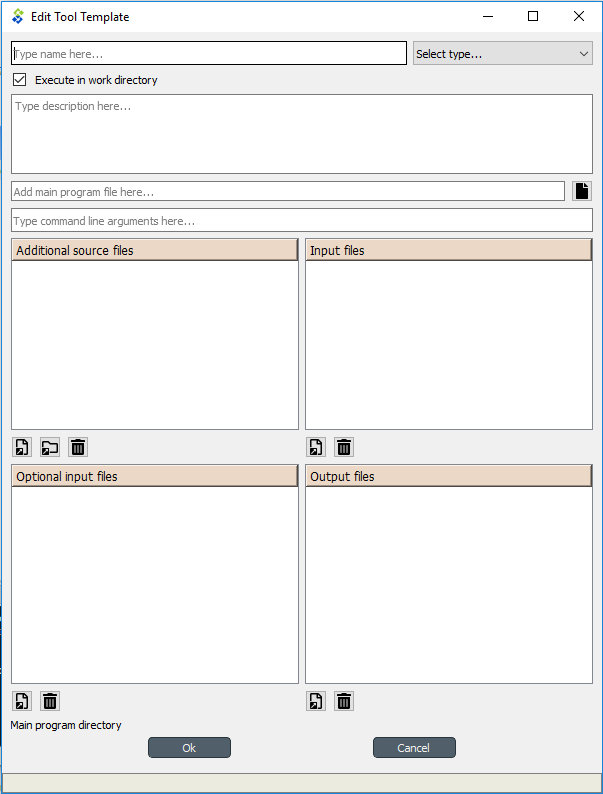
Start by giving the Tool template a name. Then select the type of the Tool. You have four options (Julia,
Python, GAMS or Executable). Then select, whether you want the Tool template to be executed in the work directory or
in its source directory (See Terminology section). You can give the Tool template a description,
describing what the Tool template does. Main program file is the main file of your simulation model, or an
executable script. You can create a blank file into a new directory by pressing the ![]() button and selecting
Make new main program or you can browse to find an existing main program file by pressing the same button and
selecting Select existing main program. Command line arguments will be appended to the actual command that
Spine Toolbox executes in the background, e.g. if you have a Windows batch file called do_things.bat, which
accepts command line arguments a and b. If you set a b on the command line arguments. This is the equivalent
of running the batch file in command prompt with the command do_things.bat a b.
button and selecting
Make new main program or you can browse to find an existing main program file by pressing the same button and
selecting Select existing main program. Command line arguments will be appended to the actual command that
Spine Toolbox executes in the background, e.g. if you have a Windows batch file called do_things.bat, which
accepts command line arguments a and b. If you set a b on the command line arguments. This is the equivalent
of running the batch file in command prompt with the command do_things.bat a b.
Additional source files is a list of files that the main program requires in order to run. You can add individual files or whole directories at once to this list.
Tip
You can also drag&drop a directory from your operating systems File Explorer into the Additional source files list.
Input files is a list of input data files that the program requires in order to execute. You can also add directories and subdirectories. Wildcards are not supported (see Optional input files).
Examples:
- data.csv -> File is copied to the same work directory as the main program
- input/data.csv -> Creates directory input/ to the work directory and copies file data.csv there
- output/ -> Creates an empty directory output/ into the work directory
Optional input files are files that may be utilized by your program if they are found. Unix-style wildcards ? and * are supported.
Examples:
- data.csv -> If found, file is copied to the same work directory as the main program
- *.csv -> All found .csv files are copied to the same work directory as the main program
- input/data_?.dat -> All found files matching the pattern data_?.dat are copied into input/ directory in the work directory.
Output files are files that will be archived into a timestamped result directory of the Tool’s project directory after the Tool template has finished execution. Unix-style wildcards ? and * are supported.
Examples:
- results.csv -> File is copied from work directory into results directory
- *.csv -> All .csv files from work directory are copied into results directory
- output/*.gdx -> All GDX files from the work directory’s output/ subdirectory will be copied to into output/ subdirectory in the results directory.
When you are happy with your Tool template, click Ok, and you will be asked where to save the Tool template file. It is recommended to save the file into the same directory where the main program file is located. The Tool template file is a text file in JSON format and has an extension .json
Tip
Only name, type, and main program file fields are required to make a Tool template. The other fields are optional.
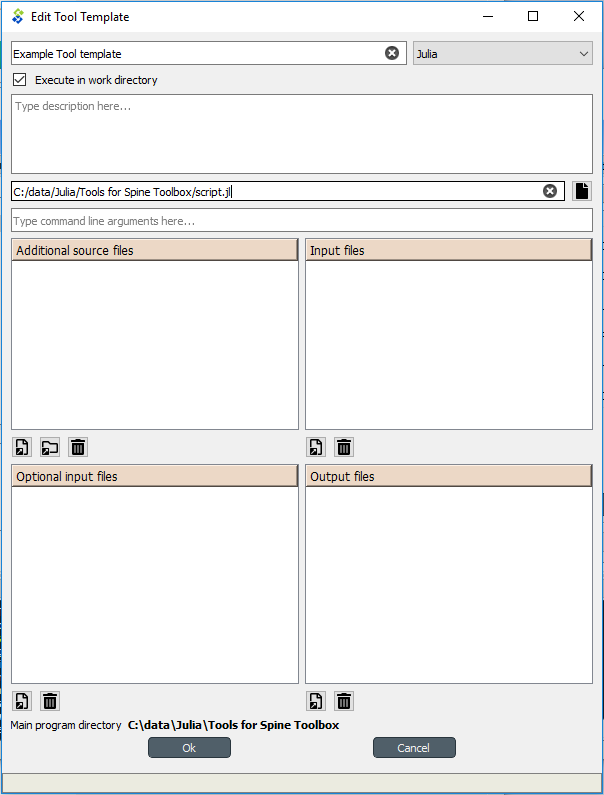
Here is a minimal Tool template for a Julia script script.jl
Note
Under the hood, the contents of the Tool template are saved to a Tool template definition file in JSON format. Users do not need to worry about the contents of these files since reading and writing them is managed by the app. For the interested, here are the contents of the Tool template definition file that we just created.:
{
    "name": "Example Tool template",
    "description": "",
    "tooltype": "julia",
    "execute_in_work": true,
    "includes": [
        "script.jl"
    ],
    "inputfiles": [],
    "inputfiles_opt": [],
    "outputfiles": [],
    "cmdline_args": ""
}
After the user has clicked Ok and saved the file, the new Tool template has been added to the project.
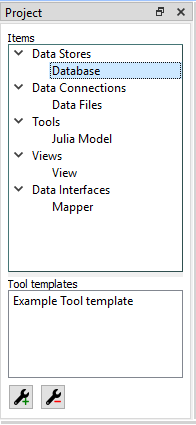
To edit this Tool template, just right-click on the Tool template name and select Edit Tool template from the context-menu.
You are now ready to execute the Tool template in Spine Toolbox. You just need to select a Tool item in the
Design view, set the template Example Tool template to it, and click ![]() or
or ![]() button.
button.