Getting Started
Welcome to the Spine Toolbox’s getting started guide. In this guide you will learn two ways of running a “Hello, World!” program on Spine Toolbox. The following topics are touched (although not exhaustively covered):
Spine Toolbox Interface
The central element in Spine Toolbox’s interface is the Design View, where you can visualize and manipulate your project in a pictorial way. Alongside Design view there are a few ‘dock widgets’ that provide additional functionality:
Project provides a more concise view of your project, including:
- Items currently in the project, grouped by category: Data Stores, Data Connections, Tools, Views, and Data Interfaces.
- Tool templates available in the project.
Properties provides an interface to interact with the currently selected project item.
Event Log shows relevant messages about every performed action.
Process Log shows the output of executed Tools.
Julia console provides an interface to interact with the Julia programming language, and also allows Spine Toolbox to execute Julia Tools.
Python console provides an interface to interact with the Python programming language, and also allows Spine Toolbox to execute Python Tools.
Tip
You can drag-and-drop the Dock Widgets around the screen, customizing the interface at your will. Also, you can select which ones are shown/hidden using either the View/Dock Widgets menu, or the main menu toolbar’s context menu. Spine Toolbox remembers your configuration between sessions. Selecting Restore Dock Widgets from the View/Dock Widgets menu restores the widgets back to their default location.
Tip
Most elements in the Spine Toolbox’s interface are equipped with tool tips. Leave your mouse cursor over an element (button, view, etc.) for a moment to make the tool tip appear.
Creating a Project
To create a new project, please do one of the following:
- From the application main menu, select File -> New project…
- Press Ctrl+N.
The New Project form will show up. Type ‘hello world’ in the name field —we will leave the description empty this time— and click Ok.
Congratulations, you have created a new project.
Creating a Tool template
Note
Spine Toolbox is designed to run and connect multiple tools, which are specified using Tool Templates. You may think of a Tool Template as a self-contained program specification including a list of source files, required and optional input files, and expected output files. Once a Tool template is added to a project, it can then be associated to a Tool item for its execution as part of the project workflow.
In the Project dock widget, click on the ‘add tool template button’ (![]() )
just below the Tool templates list, and select New from the popup menu.
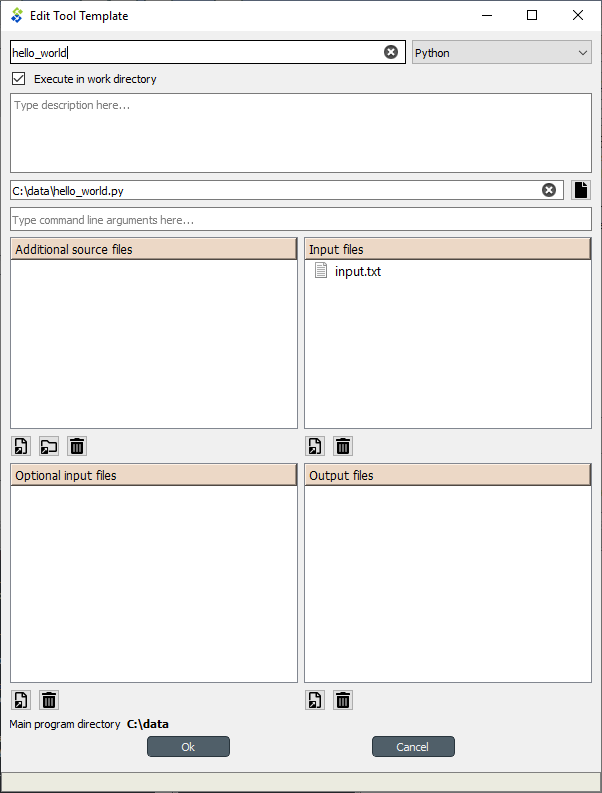
The Edit Tool Template form will appear. Follow the instructions below to create a minimal Tool template:
)
just below the Tool templates list, and select New from the popup menu.
The Edit Tool Template form will appear. Follow the instructions below to create a minimal Tool template:
- Type ‘hello_world’ in the Type name here… field.
- Select ‘Python’ from the Select type… dropdown list,
- Click on the
 button right next to the field that reads Add main program file here…, and
select the option Make new main program from the popup menu.
button right next to the field that reads Add main program file here…, and
select the option Make new main program from the popup menu. - A file browser dialog should open. Name the file hello_world.py and save it in a folder of your choice.
After this, the Edit Tool Template form should be looking similar to this:

Click Ok at the bottom of the form. A new system dialog will appear, allowing you to select a file name and location to save the Tool template we’ve just created. Don’t change the default file name, which should be hello_world.json. Just select a folder from your system (it can be the same where you saved the main program file) and click Save.
Now you should see the new tool template in the Project widget, Tool templates list.
Tip
Saving the Tool template into a file allows you to add and use the same Tool template in
another project. To do this, you just need to click on the add tool button (![]() ),
select Add existing… from the popup menu, and then select the tool template file from your system.
),
select Add existing… from the popup menu, and then select the tool template file from your system.
Congratulations, you have just created your first Tool template.
However, the main program file hello_world.py was created empty, so for the moment this Tool template does absolutely nothing. To change that, we need to add instructions to that program file so it actually does something when executed.
Right click on the ‘hello_world’ item in the Tool templates list and select Edit main program file… from the context menu. This will open the file hello_world.py in your default editor.
Enter the following into the file’s content:
print("Hello, World!")
Save the file.
Now, whenever hello_world.py is executed, the sentence ‘Hello, World!’ will be printed to the standard output.
Adding a Tool item to the project
Note
The Tool item is used to run Tool templates available in the project.
Let’s add a Tool item to our project, so that we’re able to run the Tool template we created above. To add a Tool item please do one of the following:
- From the application main menu, select Edit -> Add Tool.
- Drag-and-drop the Tool icon (
 ) from the Drag & Drop Icon toolbar onto the Design View.
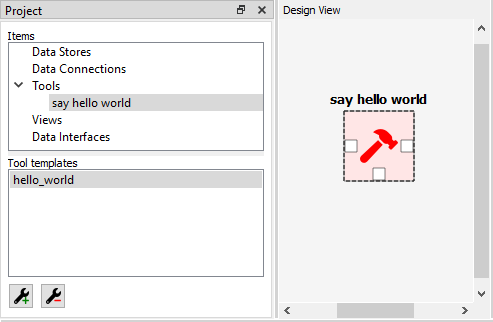
The Add Tool form will popup. Type ‘say hello world’ in the name field, select ‘hello_world’ from the dropdown list just below, and click Ok. Now you should see the newly added Tool item as an icon in the Design View, and also as an entry in the Project dock widget, Items list, under the ‘Tools’ category. It should look similar to this:
Executing a Tool
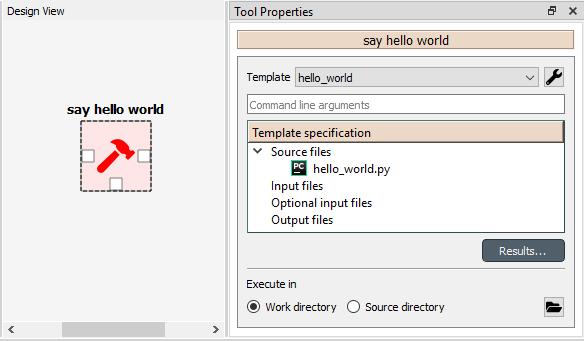
As long as the ‘say hello world’ Tool item is selected, you will be able to see its Properties on the right part of the window, looking similar to this:
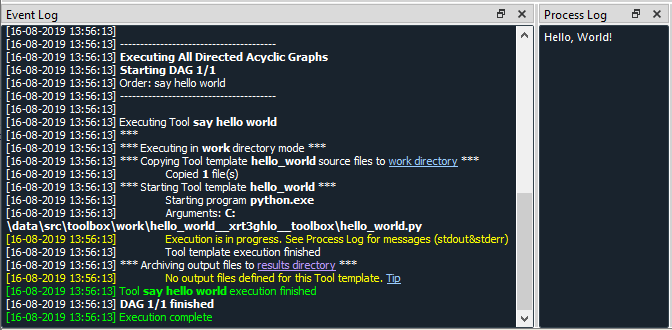
Press execute project ![]() button on the toolbar. This will execute the Tool template ‘hello world’,
which in turn will run the main program file hello_world.py in a dedicated process.
button on the toolbar. This will execute the Tool template ‘hello world’,
which in turn will run the main program file hello_world.py in a dedicated process.
You can see more details about execution in the Event Log. Once it’s finished, you will see its output in the Process Log or in the Python Console depending on your settings (See Settings).
Congratulations, you just ran your first Spine Toolbox project.
Editing a Tool template
To make things more interesting, we will now specify an input file for our ‘hello_world’ Tool template.
Note
Input files specified in the Tool template can be used by the program source files, to obtain some relevant information for the Tool’s execution. When executed, a Tool item looks for input files in Data Connection and Data Store items connected to its input.
Click on the ‘tool template options’ button (![]() ) in ‘say hello world’
Properties, and select Edit Tool template from the popup menu.
This will open the ‘Edit Tool Template’ form pre-filled with data from the ‘hello_world’ template.
) in ‘say hello world’
Properties, and select Edit Tool template from the popup menu.
This will open the ‘Edit Tool Template’ form pre-filled with data from the ‘hello_world’ template.
Click the add input files and/or directories ![]() button right below the Input files list
A dialog will appear that lets you can enter a
name for a new input file. Type ‘input.txt’ and click Ok. The form
should now be looking like this:
button right below the Input files list
A dialog will appear that lets you can enter a
name for a new input file. Type ‘input.txt’ and click Ok. The form
should now be looking like this:
Click Ok at the bottom of the form.
Note
See Tool template editor for more information on editing Tool templates.
So far so good. Now let’s use this input file in our program.
Click on the ‘tool template options’ button (![]() ) again,
and this time select Edit main program file… from the popup menu. This will open the file
hello_world.py in your default editor.
) again,
and this time select Edit main program file… from the popup menu. This will open the file
hello_world.py in your default editor.
Delete whatever it’s in the file and enter the following instead:
with open("input.txt") as input_file:
    print(input_file.read())
Save the file.
Now, whenever hello_world.py is executed, it will look for a file called ‘input.txt’ in the current directory, and print its content to the standard output.
Try executing the tool by pressing ![]() in the toolbar.
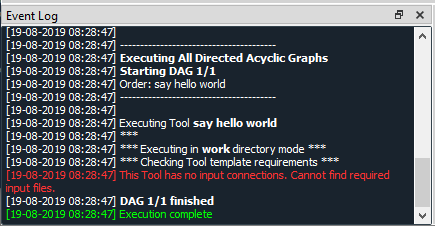
The execution will fail. This is because the file ‘input.txt’ is not
made available for the Tool:
in the toolbar.
The execution will fail. This is because the file ‘input.txt’ is not
made available for the Tool:
Adding a Data Connection item to the project
Note
The Data Connection item is used to hold and manipulate generic data files, so that other items, notably Tool items, can make use of that data.
Let’s add a Data Connection item to our project, so that we’re able to pass the file ‘input.txt’ to ‘say hello world’. To add a Data Connection item, please do one of the following:
- From the application main menu, click Edit -> Add Data Connection.
- Drag-and-drop the Data Connection icon (
 ) from the main window toolbar onto the Design View.
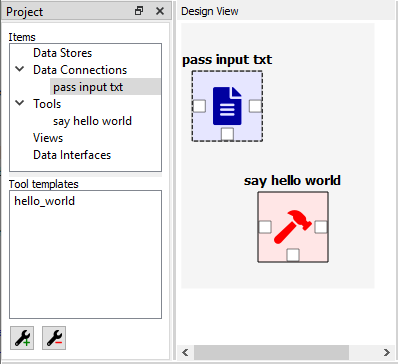
The Add Data Connection form will show up. Type ‘pass input txt’ in the name field and click Ok. Now you should see the newly added Data Connection item as an icon in the Design View, and also as an entry in the Project dock widget, Items list, under the ‘Data Connections’ category. It should look similar to this:
Adding data files to a Data Connection
As long as the ‘pass input txt’ Data Connection item is selected, you will be able to see its Properties on the right part of the window, looking similar to this:
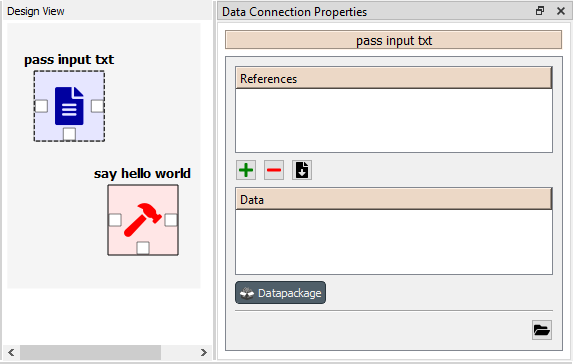
Right click anywhere within the Data box and select New file… from the context menu. When prompted to enter a name for the new file, type ‘input.txt’ and click Ok.
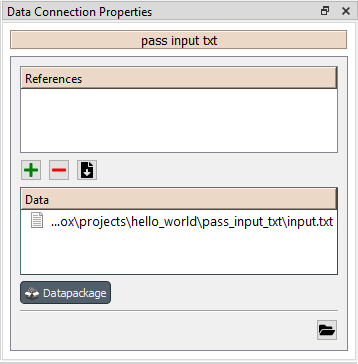
Now you should see the newly created file in the Data list:
Double click on this file to open it in your default text editor. Then enter the following into the file’s content:
Hello again, World!
Save the file.
Connecting project items
As mentioned above, a Tool item looks for input files in Data Connection and Data Store items connected to its input. Thus, what we need to do now is create a connection from ‘pass input txt’ to ‘say hello world’, so the file ‘input.txt’ gets passed.
To do this, click on one of the connector slots at the edges of ‘pass input txt’ in the Design view, and then on a similar slot in ‘say hello world’. This will create an arrow pointing from one to another, as seen below:

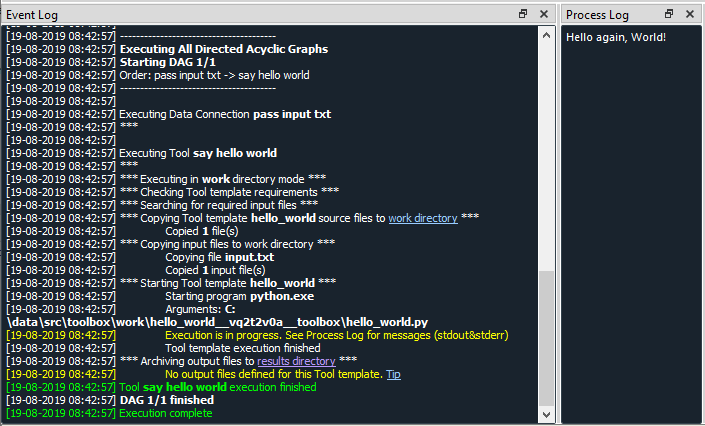
Press ![]() on the toolbar. The Tool will run successfully this time:
on the toolbar. The Tool will run successfully this time:
That’s all for now. I hope you’ve enjoyed following this guide as much as I enjoyed writing it. See you next time.