Basics of High-Performance Computing (HPC) Systems
This section briefly describes how common HPC systems work. The description is intentionally general so it applies to:
University HPC clusters
Company internal clusters
Cloud-based HPC environments (e.g., AWS, Azure)
If you are already familiar with HPC systems, you can jump directly to the next section: Running Spine Toolbox projects on HPC systems.
Introduction
Most HPC systems follow a similar architecture composed of three main components:
Login node: the entry point to the system where users connect, prepare job scripts, and submit jobs
Compute nodes: the machines where the actual computational work is executed
Scheduler (e.g., Slurm): the system responsible for allocating resources and dispatching jobs to compute nodes
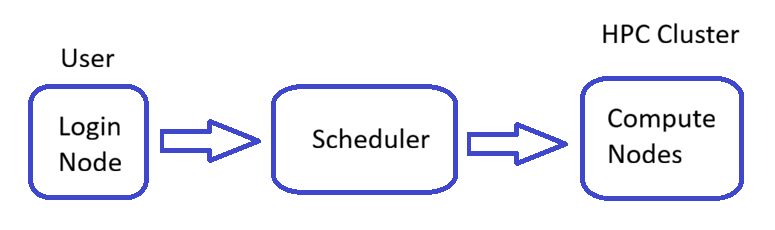
Conceptual structure of an HPC cluster
Users typically interact only with the login node. After a job is submitted, the scheduler assigns it to available compute nodes, where it runs—often in parallel across multiple CPUs or nodes.
Warning
Do not run heavy computations on the login node. It is intended only for job preparation and submission.
Workflow Overview
A typical HPC workflow separates job preparation from execution:
The user prepares input data and job scripts on their local machine
The job is submitted to the scheduler via the login node
The scheduler places the job in a queue and assigns resources when available
The job runs on compute nodes
Results are stored on the cluster and can be retrieved back to the local environment
This separation allows HPC systems to efficiently share resources among many users.

Overview of the HPC workflow
Job Lifecycle
When a job is submitted to the scheduler (such as Slurm), it goes through several states:
PENDING: the job is waiting in the queue for resources to become available
RUNNING: the job is actively executing on compute nodes
COMPLETED: the job has finished successfully (or terminated with an error)
Understanding these states helps explain why jobs may not start immediately—waiting in the queue is normal and depends on factors such as resource availability and system load.

Lifecycle of a Slurm job, including submission, queuing, execution, and completion stages.
Connecting to the Cluster
Login
You need access rights (username/password) for your HPC cluster, which you should request from the HPC administrator. Once you have the necessary rights, you can make an SSH connection from your terminal to the HPC login node.
ssh username@cluster.address
On Windows, you can use Command Prompt, Powershell or a dedicated SSH client such as PuTTY. You can install PuTTY from the Windows Store or from the PuTTY site.
File Transfer
You can use scp to transfer files between your local system and the login node.
scp -r my_project/ username@cluster:/home/username/
However, in the long run this may become tedious, so it is recommended that you use for example WinSCP, which makes file transfers quicker by providing an easy to use drag-and-drop UI.
Understanding the Cluster Environment
Working on an HPC cluster differs from working on a local machine. The filesystem is typically distributed and shared across compute nodes, and different directories are designed for specific purposes. Using them correctly is essential for performance, data safety, and efficient workflows.
Common Directory Types
Running applications on a cluster requires that all compute nodes involved in a job can access the same files. This is usually achieved through a shared parallel filesystem. While directory names vary between systems, most clusters provide the following types of storage:
$HOME(or home directory)Your personal home directory. This is persistent storage, meaning files are kept long-term and often backed up. However, it is typically not optimized for heavy I/O workloads, so it should mainly be used for:
Source code
Configuration files
Small input datasets
Scripts and job submission files
High-performance temporary storage (often called
$SCRATCHor similar)A fast storage area intended for temporary data and intensive I/O operations. The exact location and name vary by system. Examples include:
$SCRATCH(if defined)/scratch/tmp/jobs(on some systems)
Consult your system documentation to find the correct path.
Use this storage for:
Large simulation outputs
Intermediate data
Temporary working files
Note
These locations are usually not backed up and may be cleaned automatically after a retention period. Always copy important data to persistent storage.
Project or shared storage (often called
$PROJECTor$WORK)A shared directory intended for collaborative work within a project or research group. Not all systems provide this, but when available it typically offers more space than
$HOMEand longer retention than temporary storage.Common uses include:
Shared datasets
Group software installations
Results that need to be preserved longer-term
Note
If your system does not provide a dedicated project directory, you may need to manage shared data manually in agreed-upon locations.
Best Practices
Because directory names vary between systems, always adapt these guidelines to the paths provided on your cluster:
Copy input data from persistent storage (e.g.
$HOMEor project space) to temporary high-performance storage before running jobs.Perform all compute-intensive tasks using the high-performance temporary storage (e.g.
$SCRATCHor/jobs).Regularly clean up unnecessary files from temporary storage.
Avoid running large jobs directly from your home directory.
Example Workflow
A typical workflow might look like:
Prepare input files and scripts in your home directory (
$HOME)Copy necessary data to the system’s temporary work directory (e.g.
$SCRATCHor/jobs)Run the job using the scheduler
Copy final results back to persistent storage (
$HOMEor project space)Clean up temporary data
This approach ensures efficient use of cluster resources while keeping your data safe and organized. next section, Running Spine Toolbox projects on HPC systems provides an actual example workflow for executing Spine Toolbox projects in an HPC environment.
Module System
Environment modules is a system tool to manage the shell environment. It makes it easier to handle the shell environment when there are e.g. multiple versions of the same software installed. You can get a list of available modules with command
module avail
The needed module can be loaded with the command
module load <module_name>
A module can be unloaded with the command
module unload <module_name>
You can load any modules you need in a Slurm script with the module load command.
Slurm - Basic Commands
These basic commands should be available in the HPC login node to help you get started. There are many more commands available, please also read your HPC documentation if there are special circumstances you should be aware of when using Slurm.
sinfo
This command gives a quick overview of the cluster status. It shows the status of different partitions, time limits, and available nodes.
squeue
This command outputs information of all queues on all partitions. You can filter the output by partition with the -p argument, or by username with the -u argument. For example, squeue -u <username> prints the queued jobs of user <username>.
sbatch
This command will submit a job script to the queue. For example, sbatch job.sh. Please make sure that the batch script file uses Unix (LF) line endings.
scancel
This command cancels a job. It needs a job id as an argument. For example, scancel 10346.
srun
This command runs a single command on Slurm. It needs the same arguments for resource reservation as sbatch. For example srun -J jobname –mem=64000 –pty -n 36 -p large36 /bin/bash.
scontrol show job
This command outputs detailed information about a job. It needs job id as an argument. For example, scontrol show job 10345.